Technically possible? Budget approved? Great. You've made it through the first step (Upgrading from Craft 2 to Craft 3: Should I update?) and you're moving forward. Time to take a few steps so that you’re happier when something goes wrong during the migration.
As a migration often involves troubleshooting where things were and where things are going, I recommend creating two folders alongside your main website folder so that you have a staging area and can reference your Craft 2 site and Craft 3 site side by side during the migration.
Folder | Purpose |
---|---|
website.com/ | your main site / git repository |
staging area for initial Craft 3 site | |
a copy of the fully upgraded website.com Craft 2 site in case you need to reference anything after you overwrite website.com with website.com-craft3 |
These secondary folders don’t need to be in your repository, they’ll just be temporary until you’ve finished the migration. It is possible to refer to these updates by moving forward and backward in your git history though I find it easier to have the separate folders so I can easily copy files from the old Craft 2 site to the new Craft 3 site and reference anything that I may need to from each install along the way.
You'll start your migration journey with Craft 2 and Craft 2 alone. Time to spend your last days together, reminisce on the good times, and say goodbye. During this final hurrah, you’ll want to get the codebase updated and cleaned up as best you can on your Craft 2 install so you are less likely to have to deal with outlier scenarios once you begin updating to Craft 3.
If you are upgrading larger plugins or if your Craft or plugin updates require upgrading over major versions (e.g. from 1.x of a plugin to 3.x) be sure to refer to the respective documentation in case there are additional steps you need to take during the updates.
I recommend making atomic commits after any file changes as you upgrade the Craft 2 site below and exporting database backups after any key database migrations. You want to have the ability to roll back to key points in the upgrade process if you need to troubleshoot anything unexpected that you discover later.
Whether you prefer to track your vendor
folder or not once you get updated to Craft 3, I find that during migrations, it often is helpful to create a branch where you can commit your vendor folder and easily track changes in the repository. This makes it a lot easier to focus on the migration and move backward and forward to specific commits without having to re-run composer each time you want to recreate the instance of the site you want to be working with.
Commit Message | Database Backup |
---|---|
Last feature on Craft 2 site | website.com-c2-start.sql |
Updated to Craft 2.7.4 | website.com-c2-cms-updated.sql |
Updated plugins to latest versions | website.com-c2-plugins-updated.sql |
… | website.com-c2-manual-db-cleanup.sql |
Updated to Craft 3 file structure | website.com-c3-initial-upgrade.sql |
Added Craft 3 plugins | website.com-c3-plugins-installed.sql |
Craft runs a database backup before performing each update. I prefer to disable this setting in the general.php config (disableDbBackups
) and backup the database manually. This lets me label it as it relates to where I am in the migration process and the upgrades themselves run a lot quicker so it’s easier to rollback and re-run an update multiple times if you are troubleshooting a problem.
This comes in handy in several scenarios including if you need to re-run the migration during a scheduled content freeze. You can now pull down the latest database, revert to the last commit where you still had Craft 2 installed, trigger the Craft 2 updates on the latest database, move forward and checkout the commit where you updated the app structure to Craft 3, and trigger the Craft 3 updates to the database. You can trigger these updates all at once or step through your commits to trigger specific Craft or Plugin updates one by one.
While the upgrades should make most of the necessary database changes you need, I like to take this opportunity during the transition to review the database for anything I may no longer need that I've been avoiding to clean up.
Out of respect for the next developer (and yourself in a few months), make sure the settings and content you have in the database are necessary so that someone else doesn't have to figure out why a bunch of extraneous things are not relevant at some later time.
Review your site for unused sections, settings that have URLs enabled that don't need to have URLs enabled, unused Fields, Asset Sources and Routes, and whatever else your particular site might have to consider.
Depending on your comfort level and familiarity with the data structure of the plugins you are using, at this point, you may also want to review your database directly. If you're not comfortable with database management, just skip to the next section.
There are several scenarios where you can end up with unused database tables or rows or columns in your database. In most cases, they will not cause issues and in some cases, Craft's decision to leave certain things in the db is a feature, not a bug.
Extraneous tables can be left in your database if you delete a plugin's files from the repository before uninstalling it from the control panel or even when you uninstall a plugin from the control panel, as it is a plugin's responsibility (not Craft's) to decide how to clean up any custom schema when it is uninstalled.
At the very least, I typically look through the database manually and make sure that any tables that related to plugins that were uninstalled have also been removed and ensure that the rows in the craft_plugins
table reflect only the plugins that are installed.
You can also take this opportunity to clean up your templates directory. Remove unused files like demo templates or anything else that's been there a while that you really don't need any longer but you've been too lazy to clean up.
Finally, review and resolve any outstanding Deprecation Warnings. This is the only time these warnings really matter as you're preparing for a major version upgrade. Any items listed here that may still be working on your Craft 2 site are scheduled to break in Craft 3, so review them and get them cleaned up before you hit that upgrade button.
Craft 2 looking good? Time to upgrade to Craft 3: A Fresh Craft 3 Install
This article is part of a series:
Similar to Stage 2, I'll begin Stage 3 focusing on Craft 3 and Craft 3 alone.
Create a separate folder website.com-craft3/
and follow the Craft 3 Upgrade instructions: Upgrading from Craft 2. I won't go into them in detail here but at the top level you'll start by installing a fresh version of Craft.
I like to use the Barrel Strength Craft starter project:
composer create-project barrelstrength/craft-master <Path>
Whatever you choose as your default project, be sure to update your .gitignore
to reflect any project-specific considerations in the new folder structure. The default .gitignore
excludes the vendor/
folder, which is a change that may also require an update to your devops and deployment workflows, so if you're not ready or interested in changing those workflows, you may want to remove that line and include the vendor/
folder so you can track all of your changes in the repository.
The upgrade documentation details a solid list of files that you may want to copy over from your Craft 2 to your Craft 3 site. I've listed the key files mentioned in the docs in the table below:
Craft 2 | Craft 3 | Notes |
---|---|---|
craft/config/general.php | config/general.php | |
craft/config/license.key | config/license.key | |
craft/config/redactor/ | config/redactor/ | Custom Redactor config files. See gotchas on syntax in the Craft 3 changes docs. |
craft/storage/rebrand/ | storage/rebrand/ | Custom login page logo and site icon files |
craft/storage/userphotos/ | storage/userphotos/ | Copy to new project’s directory. You can customize the location of this now in Assets. |
craft/templates/ | templates/ | |
public/index.php | web/index.php | Copy any changes you made |
public/ | web/ | Copy any other custom web accessible files |
/ | / | Copy any other files above web root |
This is one of the stages where it's nice to have two folders. Pull up two file browsers side by side and copy the relevant files from the Craft 2 site to the Craft 3 site.
At this point, you have two separate projects in two separate folders:
Time to bring it all together.
For the following updates, I prefer to branch off of the latest, updated master
branch: feature/craft3-migration
. This lets me easily trash the branch and start over if I get curious and experimental or if things blow up and also lets me maintain a standard project workflow if anything comes up on the current website during the migration process.
Instead of merging your Craft 3 changes into you Craft 2 master branch, consider bringing your two projects together in two, atomic commits. While git is great at tracking history and file changes what you are about to do is almost entirely meaningless as far as diffing and comparing files goes. You're changing the entire folder structure and the files that change are not going to be tracked in a way that you can easily compare them in your project history.
For the first upgrade commit delete all of the files from the Craft 2 site from the repository. Everything except the .git/
directory. For the second commit, copy in all of the files from the Craft 3 project you just created.
Commit Message | Database Backup |
---|---|
Deleted Craft 2 website files | website.com-c2-pre-upgrade.sql |
Added Craft 3 website files | website.com-c3-initial-upgrade.sql (after you run the update) |
This gives you two clear commits that you can revert back to in the project history if you need to re-run the Craft 2 upgrade or explore additional scenarios with your Craft 3 database after the upgrade.
Now that the repository is ready, we can move on to the database migration.
This article is part of a series:
The Craft documentation is a great place to start if you are updating from Craft 2 to Craft 3. If you haven’t already, read over the Upgrading from Craft 2 and Changes in Craft 3 pages. You’ll likely refer to these pages throughout the migration process.
The series of articles below are not meant to be a replacement for the docs but to provide a compendium of notes, considerations, and workflow preferences that I’ve found to complement the guides above while upgrading several Craft sites. These articles will cover:
Before you agree to upgrade a site to Craft 3, you’ll want to review the site and confirm that it’s possible to do so. One part of this question is if it’s technically possible (which it usually is). The more liking binding consideration is if a budget will be able to cover the work involved.
The primary blockers I’ve run into for sites upgrading to Craft 3 are on sites with lots of custom development and sites using plugins that have not yet been (or will not be) upgraded to Craft 3. Both scenarios result in additional budget considerations as, while the general upgrade process is fairly straightforward and reasonable for most budgets, these scenarios lead to additional custom development considerations.
To start off, open your favorite spreadsheet tool or text editor and review all the plugins on your site. List out each one, do your research, and identify its upgrade path for Craft 3. If a plugin doesn’t have an upgrade path, you’ll need to decide whether you want to wait for the developer to update it (assuming they will) or find an alternative path (such as rebuilding it yourself, assuming they won’t be upgrading it). Both paths are reasonable depending on your project requirements.
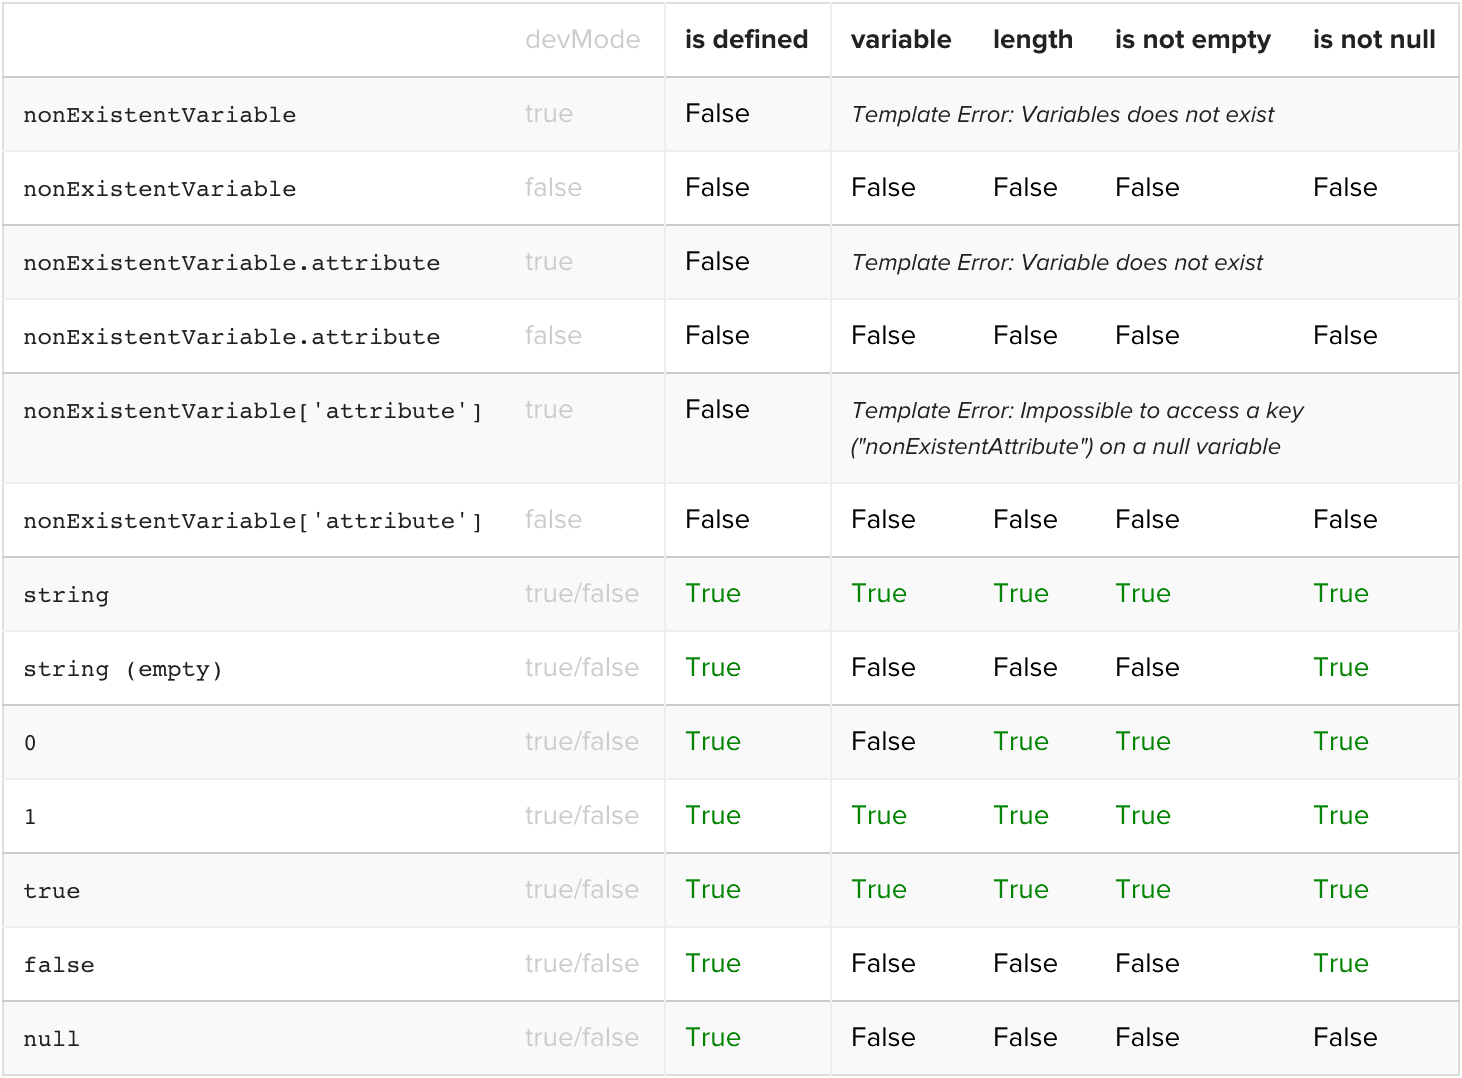
This step can be tedious if you have lots of plugins. Craft provides an overview of what it knows about your installed plugins at the bottom of the Craft 2 update page. That information is maintained via the craft2-plugins.php file on the Craftnet repo if you want to propose an update to the information you see there. If you can’t determine your upgrade path from there, you may need to look up various plugins individually.
If you’re on an older installation of Craft, be sure to read over the Server Requirements for Craft 3 and make sure you meet the PHP and MySQL requirements. If you don’t, you may have to plan and budget for getting upgraded to a new server as well.
On the business side of things, now is also the time to begin the conversation with your employer or client about Craft 3's new subscription model. This will feel like a big change for many but the subscription model is a much better reflection of the ongoing costs of maintaining a website over time so it's well worth the time to review your pricing, educate your clients, and get folks on board.
While many Craft 2 sites will be grandfathered into licenses that won't have renewal fees, any new plugins added in the future will be subject to the new model so it's worth making sure everyone understands the changes that are happening to the ecosystem upfront.
While it can feel premature, determine how you expect to deploy the updated Craft 3 site.
On many sites, content editors will need to continue making updates through part of the time you spend on the migration and this will lead to the current production database and the newly migrated database getting out of sync. Depending on the needs of your project, the workflow around the database updates can take several different forms:
For the designers, junior developers, and one-click-updaters out there, there is one more area I’d encourage you to plan ahead for: your skill set.
Be honest with yourself and honest with your clients or employer. While you may really, really want to upgrade to Craft 3, don’t let the pretty UI fool you. Craft continues to be a custom CMS and requires a certain amount of development knowledge to use and maintain properly. Craft 3 introduces an entirely new architecture and relies on technologies like Composer that may test your skill set when things go wrong. Craft 3.1 and 3.2 are also fairly big updates and can introduce a variety of other factors to consider while updating.
If you are not using a repository like git to manage your codebase and deploying your updates using a deployment tool, it may be best to first take the time to learn and become comfortable with those skills.
Plan some time for a contractor or coach in the budget to help level-up and avoid common problems along the way. Straight Up Craft offers integrated coaching and training services and there are several qualified agencies and developers in the Craft community who can help you out too.
In the case you will need to do any custom development or data migrations to get upgraded, you may want to jump ahead to step 6 and plan those out specifically. While, as far as complexity goes, I’ve placed the Custom Development section toward the end of these notes, practically speaking, that development is probably going to have to happen first so that it is ready when you are performing the upgrade process.
In the next article, we'll begin the upgrade: Update Everything on Craft 2
This article is part of a series:
Firstly, a brief disclaimer. I am the developer of a security plugin for Craft CMS, which I will refer to later in this article, so it is obviously in my interest to bring security issues to the surface. In saying that, my intention here is not to create concern or fear, but to create awareness and hopefully help other developers to be better educated about security issues in Craft and in content management systems in general.
Coming to Craft CMS from ExpressionEngine, I always felt safe in the knowledge that the company behind my CMS of choice was extremely competent when it came to preventing and fixing security issues and vulnerabilities in the software they developed. Having personally known members of the team behind both ExpressionEngine and Craft and how dedicated they were to their products, I kind of just assumed that security was taken care of. I followed the suggested best practices and didn’t think much beyond that.
In April 2016, the Panama Papers story broke which changed all of that:
“The Panama Papers are an unprecedented leak of 11.5m files from the database of the world’s fourth biggest offshore law firm, Mossack Fonseca. The records were obtained from an anonymous source by the German newspaper Süddeutsche Zeitung, which shared them with the International Consortium of Investigative Journalists (ICIJ). The ICIJ then shared them with a large network of international partners, including the Guardian and the BBC.
What do they reveal? The documents show the myriad ways in which the rich can exploit secretive offshore tax regimes. Twelve national leaders are among 143 politicians, their families and close associates from around the world known to have been using offshore tax havens.”
– Source: The Guardian
The scale of the data leak was unprecedented:
“The Panama Papers include approximately 11.5 million documents – more than the combined total of the Wikileaks Cablegate, Offshore Leaks, Lux Leaks, and Swiss Leaks. The data primarily comprises e-mails, pdf files, photo files, and excerpts of an internal Mossack Fonseca database. It covers a period spanning from the 1970s to the spring of 2016.”
– Source: Süddeutsche Zeitung
What shocked me even more than the scale of the leak, however, was the nature of the exploit:
“Mossack Fonseca (MF), the Panamanian law firm at the center of the so-called Panama Papers Breach may have been breached via a vulnerable version of Revolution Slider. ... The MF website runs WordPress and is currently running a version of Revolution Slider that is vulnerable to attack and will grant a remote attacker a shell on the web server.”
– Source: Wordfence
That’s right, one of the biggest leaks of all time may have been caused by a vulnerability in a $25 WordPress plugin!!
“A theory on what happened in the Mossack Fonseca breach: A working exploit for the Revolution Slider vulnerability was published on 15 October 2014 on exploit-db which made it widely exploitable by anyone who cared to take the time. A website like mossfon.com which was wide open until a month ago would have been trivially easy to exploit. ... Once they establish that the site is vulnerable from the above URL the robot will simply exploit it and log it into a database and the attacker will review their catch at the end of the day. It’s possible that the attacker discovered they had stumbled across a law firm with assets on the same network as the machine they now had access to. They used the WordPress web server to ‘pivot’ into the corporate assets and begin their data exfiltration.
– Source: Wordfence
In case you missed it, the Revolution Slider plugin exploit was made public in October 2014, that is a full one and a half years before the leak was revealed. The plugin vulnerability was actually patched with a security update in February 2014, yet the seriousness of the update was either not communicated or simply ignored.
– Source: Sucuri
Ok, so Mossack Fonseca’s WordPress powered website was running an outdated version of a plugin that contained a known and easily exploitable vulnerability, so a hacker could have gotten access to the CMS, but how did that result in such a huge data leak?
“Once you gain access to a WordPress website, you can view the contents of wp-config.php which stores the WordPress database credentials in clear text. The attacker would have used this to access the database. … MF are also running the ALO EasyMail Newsletter plugin which provides list management functionality. One of the functions it provides is to receive bounced emails from a mail server and automatically remove those bounced mails from the subscriber list. To do this, the plugin needs access to read emails from the email server. This plugin also stores email server login information in the WordPress database in plain text. In this case the login information provides the ability to receive mail via POP or IMAP from the mail server. … Once the attacker also had access to this data, after gaining access to the WordPress database via Revolution Slider, they would have been able to sign-into the email server and would be able to read emails via POP or IMAP.”
– Source: Wordfence
So a second plugin that stored credentials in the database in plain text could have ultimately given hackers full access to the company’s email server. HOLY CRAP!!
It is important to state here that regardless of whether WordPress was fully up to date at the time, a single outdated plugin with a vulnerability was what likely granted unauthorised access to the CMS and database.
This was the moment it hit me that a CMS can be only as secure as the plugins it is running. Regardless of whether you are using the latest secure version of ExpressionEngine or Craft, if you have plugins installed then your site may be at risk.
Now you may be thinking that your site is just a portfolio website, or the front-facing part of your client’s business, and that it doesn’t contain any sensitive information. What could go wrong? Well just as a simple example, if your site’s database is compromised and you happen to have saved your email credentials in Craft’s email settings, then those are available in plain text and you suddenly become susceptible to an email server attack:
This revelation prompted me to audit all of my own plugins and to go one step further and write my own security plugin for Craft:
“Sherlock is a security scanner and monitor to keep your site and CMS secure. … If your site ever fails the security scan in future then you will be notified immediately by email and with a control panel alert.”
– Source: PutYourLightsOn
To put it briefly, Sherlock runs a security audit of your Craft site and monitors it by running daily (or otherwise scheduled) scans. If your site is ever found to fail a security scan then you are notified immediately with an email and a notification in the CMS control panel. Besides running a large number of tests on your site’s configuration, Sherlock checks if your version of Craft or any installed plugins are outdated. Additionally it checks for critical security updates, both to Craft and your plugins. As a final precaution, it checks for known plugin vulnerabilities in a public Github repository that is open for contributions by the public.
While Craft in general is a very secure CMS, there have been several low priority security issues. At the time of writing, 4 security vulnerabilities have been recently documented in the Common Vulnerabilities and Exposures (CVE) list:
– Source: CVE Details
You likely haven’t heard about these vulnerabilities as they were fixed and released as normal Craft updates (not “critical”), yet looking at them is a bit worrying. I found CVE-2017-8383 particularly interesting:
“Craft CMS before 2.6.2976 does not properly restrict viewing the contents of files in the craft/app/ folder.”
I proceeding to look at the code that had been fixed in version 2.6.2976 and found an exploit which did in fact allow anyone to view the contents of files in the craft/app/ folder. At first I was a bit confused as to why this was not classified as a “critical” update, but I soon realised that the craft/app/ folder does not contain any sensitive files and is in fact even in a public repository on Github. I was hesitant to reveal more about this so I consulted Pixel & Tonic before publishing this article and they gave me the go-ahead to share the following findings.
What I found is that if a site is running Craft below version 2.6.2976 then it is possible to view the contents of all of the files in the craft/app/ folder including Info.php:
Since version 2.6.2976 was a relatively recent update, released in April 2017, I thought it would be interesting to hit a bunch of Craft sites with the above exploit and see what happened (in the name of research of course).
I scraped the URL’s of 604 sites from the StraightUpCraft project gallery and wrote a simple script to test the exploit on each of them. Of the 604 sites tested, 292 (or 48%) of them proved to be running a version of Craft that was vulnerable to the exploit. While most of them were just a few versions behind, I did see some sites running versions as far back as 2.5, 2.4 and even 2.3.
While this vulnerability may not be critical, it is not good for your version of Craft to be publicly visible, as it potentially opens your CMS up to other known exploits. And that is where a security monitor comes into play. The Sherlock plugin proactively notifies you about critical Craft updates and, perhaps even more importantly, about known vulnerabilities in any installed plugins.
With the Sherlock web app (free for license holders of the Sherlock plugin), you can manage the security of all of your Craft CMS sites that have the Sherlock plugin installed from a single dashboard.
So to wrap things up, the state of security of your CMS is not something to be taken lightly. You can outsource responsibility, but not accountability. If you or your client’s site is hacked or exploited then you may look to the developer of the CMS or a specific plugin for an explanation, but ultimately you are the one who is going to have to take the heat!
In some cases, you may want to make new functionality available to your Craft website that does not need to be installable, like a plugin. Some examples of this include:
In Craft 3, it is possible to create a Yii Module to achieve this. The ability to include Yii Modules in our Craft projects adds an exciting new dimension to Craft development.
In this article, we'll take a look at building a Yii Module that can be shared between multiple Craft plugins and adds a controller action and a new template to a Craft site. This article will assume you are comfortable with (or have a general understanding of) Craft 3 plugin development, Yii Modules, and composer.
For this example we'll need:
Our example will take place across the following files:
- composer.json
- vendor/vendorname/mycraftplugin/composer.json
- vendor/vendorname/mycraftplugin/src/Plugin.php
- vendor/vendorname/mycraftplugin/src/templates/index.html
- vendor/vendorname/myyiimodule/src/Module.php
- vendor/vendorname/myyiimodule/src/ModuleHelper.php
- vendor/vendorname/myyiimodule/src/controllers/FancyController.php
- vendor/vendorname/myyiimodule/src/templates/index.html
If your Module exists in a separate repo and does not need to be used by other plugins, you can reference it in your project's composer.json
file.
composer.json
{
...
"require": {
"vendorname/myyiimodule": "^1.0.0"
},
...
}
You can make your Module available to the Craft::$app
instance in the config/app.php
configuration file:
config/app.php
<?php
use barrelstrength\sproutcore\Module as MyYiiModule;
return [
'modules' => [
'my-yii-module' => MyYiiModule::class
],
'bootstrap' => ['my-yii-module'],
];
Your Module will now run it's Module::init()
on every page load and you can add any other functionality you need from there. You can also access your Module via the Craft::$app
instance, if you wish:
$myYiiModule = Craft::$app->getModule('my-yii-module');
This will work if your Yii Module exists in a separate repo and you are importing it as a composer dependency. If you have a project-specific module that doesn't exist as a composer dependency, you will have to take some additional steps to autoload the Module's classes in your project. We won't go into those details here.
While some Modules may be project-specific and have no plugin dependencies, if you wish to create a Module as a complement to a plugin, you'll have to take a few more steps.
In this next example, we will use a Module to complement our plugins. In this scenario, the only thing you'll need to reference in your project's composer.json
file is your plugin:
composer.json
{
...
"require": {
"vendorname/mycraftplugin": "^1.0.0"
},
...
}
In your plugin's composer.json
file, you will require your Module:
vendor/vendorname/mycraftplugin/composer.json
{
...
"require": {
"vendorname/myyiimodule": "^1.0.0"
},
...
}
You can require your Module from one or more of your plugins. Just as all libraries required by composer, your Module will only be included once in your Craft project's vendor folder.
Note: we will extend this example at the end of this article for Modules that are being developed locally and not publicly available.
In your plugin's primary class file you'll register your Yii Module and add it to the Craft::$app
instance:
vendor/vendorname/mycraftplugin/src/Plugin.php
<?php
// Make sure the ModuleHelper is loaded
use vendorname\myyiimodule\ModuleHelper;
class MyCraftPlugin extends \craft\base\Plugin
{
public function init()
{
parent::init();
// Register the Yii Module on the Craft::$app instance
SproutCoreHelper::registerMyYiiModule();
// ...
}
}
The Yii ModuleHelper class checks to see if your Module is already registered, adds it to the Craft::$app
instance, and loads it:
vendor/vendorname/myyiimodule/src/ModuleHelper.php
<?php
namespace vendorname\myyiimodule;
use Craft;
abstract class ModuleHelper
{
public static function registerMyYiiModule()
{
// Check to see if the Module is registered
if (!Craft::$app->hasModule('my-yii-module')) {
// Add it to the Craft::$app instance
Craft::$app->setModule('my-yii-module', Module::class);
// Have Craft load this module right away
// This ensures it can be used for templates
Craft::$app->getModule('my-yii-module');
}
}
}
In this example, we've chosen to register our Module with the handle my-yii-module
, however, you can choose any name you want. Be sure you choose a name that is unique as you don't want to choose something that will conflict with another plugin name.
As Craft plugins have a primary Plugin.php
file, your Yii Module has a primary Module.php
file. Here is a simple version of what that file may look like:
vendor/vendorname/myyiimodule/src/Module.php
<?php
namespace vendorname\myyiimodule;
class Module extends \yii\base\Module
{
public function init()
{
parent::init();
$this->params['foo'] = 'bar';
// ...
}
}
Once your Module is loaded, you can access your Module using the getModule
method. Let's take another look at the plugin's primary class file and access the Module after it is loaded:
vendor/vendorname/mycraftplugin/src/Plugin.php
<?php
use vendorname\myyiimodule\ModuleHelper;
class MyCraftPlugin extends \craft\base\Plugin
{
public function init()
{
parent::init();
// Register our Yii Module on our Craft::$app instance
SproutCoreHelper::registerMyYiiModule();
// Do something with our Yii Module
$myYiiModule = Craft::$app->getModule('my-yii-module');
}
}
Modules in Yii, just like Plugins in Craft, support adding custom controllers to a controllers folder. The same naming conventions apply, as Craft just gets those conventions from Yii to begin with:
vendor/vendorname/myyiimodule/src/controllers/FancyController.php
<?php
namespace vendorname\myyiimodule\controllers;
class FancyController extends BaseController
{
public function actionDoSomething()
{
// All that jazz...
}
}
You can now add a form to a template file in your Craft plugin that submits to your Yii Module's controller:
vendor/vendorname/mycraftplugin/src/templates/index.html
{% extends "_layouts/cp" %}
{% block content %}
<form method="post" accept-charset="utf-8">
{{ getCsrfInput() }}
<input type="hidden" name="action" value="my-yii-module/fancy/do-something">
<input type="text" name="whatever" value="" />
<button>Submit</button>
</form>
{% endblock %}
Notice that the URL that the action uses (admin/actions/my-yii-module/fancy/do-something
) does not include a reference to any installed plugins — just the Yii module. The my-yii-module
segment of the URL triggers your Module's controller because you registered it on the Craft::$app
instance above.
To allow your Yii Module to display templates within Craft, you'll need to take an additional step. By default, Yii Modules do not support templates in the same way that Craft does. In our Module class file, you'll need to register your Module's template path so Craft knows it can find templates there too:
vendor/vendorname/myyiimodule/src/Module.php
<?php
namespace vendorname\myyiimodule;
// Identify any classes you need to use
use Craft;
use yii\base\Event;
use craft\web\View;
use craft\events\RegisterTemplateRootsEvent;
class Module extends \yii\base\Module
{
public function init()
{
parent::init();
// Register a new templates folder within a Module
Event::on(View::class, View::EVENT_REGISTER_CP_TEMPLATE_ROOTS, function(RegisterTemplateRootsEvent $e) {
$e->roots['my-yii-module'] = $this->getBasePath().DIRECTORY_SEPARATOR.'templates';
});
}
}
Once you've registered your Module's template folder, you can now access templates in your Module in the same way that you would access them in your plugin's template folder. The following template would be visible at the URL:
http:://website.com/admin/my-yii-module/index
vendor/vendorname/myyiimodule/src/templates/index.html
{% extends "_layouts/cp" %}
{% block content %}
My Yii Module Template!
{% endblock %}
This article has assumed you could add your Yii Module to your project via composer. If your Module is public, the method described above will work fine. If you have not yet made your Module public, or you don't wish to, you'll have to take an additional step and tell composer where it can find your Module using the path
type in composer's repositories
array.
Here is an abbreviated composer file that illustrates how that might work:
{
...
"require": {
"vendorname/mycraftplugin": "^1.0.0"
},
"repositories": [
{
"type": "path",
"url": "../../relative/path/to/myyiimodule"
},
{
"type": "composer",
"url": "https://asset-packagist.org"
}
]
}
]]>By default, Craft lazy loads elements in your templates. In many cases, this works just fine and no further optimization is needed. However, if your content requires queries to the database to retrieve additional related data, you may want to consider optimizing your queries by eager loading elements.
A good rule of thumb is to consider using eager loading if you are looping through content with Relations fields (Assets, Categories, Entries, Users, Tags, and Commerce Products), Matrix Fields, or Image Transforms.
The Craft documentation provides us several examples of Eager Loading Elements, so this article will focus on extending those examples to a few more use cases, and discussing a few scenarios that the documentation doesn’t speak to directly.
Our most basic example of eager-loading, we pass the handle of the field we want to eager-load to the with
parameter:
{% set entries = craft.entries({
section: 'news',
with: [
'assetFieldHandle'
]
}) %}
The with
tag accepts an array of items, so we can add as many eager-loadable items to the array as we want. We will need to explicitly define each item that we want eager loaded:
{% set entries = craft.entries({
section: 'news',
with: [
'assetFieldHandle',
'categoryFieldHandle',
'entriesFieldHandle',
'usersFieldHandle',
'tagsFieldHandle',
'productsFieldHandle',
'matrixFieldHandle',
]
}) %}
While you only need to provide the handle of the item you want to eager load, you are also able to define additional custom parameters on each element you are eager-loading. To do so you need to update the syntax of your eager-loaded item from a simple string 'assetFieldHandle'
, to an array ['assetFieldHandle', { kind: 'image' }]
. In this example we are limiting our eager-loaded assets to only retrieve images.
{% set entries = craft.entries({
section: 'news',
with: [
['assetFieldHandle', { kind: 'image' }]
]
}) %}
Adding conditions like these can help us optimize our query to just return the data we need. The second parameter can accept any criteria parameters that you might use when using the standard Craft tag to query that element.
In the above example our with
parameter:
['assetFieldHandle', { kind: 'image' }]
Is doing the same thing we would do when querying an asset using the craft.assets
tag:
{% set assets = craft.assets.kind('image') %}
Or, an Asset Relations Field :
{% set assets = entry.assetFieldHandle.kind('image') %}
We can mix simple eager-loaded element handles with complex eager-loaded items with custom parameters:
{% set entries = craft.entries({
section: 'news',
with: [
['assetFieldHandle', {
kind: 'image'
}],
'categoryFieldHandle',
['entriesFieldHandle' {
before: someDate,
after: someOtherDate
}],
'usersFieldHandle',
['tagsFieldHandle'],
'productsFieldHandle',
'matrixFieldHandle',
]
}) %}
There are two types of eager-loadable items that have a different syntax: Matrix Blocks and Image Transform Indexes. The principles behind eager-loading these items are the same, but the syntax is slightly different.
When we load data from a field within a Matrix Blocks, we have to identify which Block Type our field exists under.
{% set entries = craft.entries({
section: 'news',
with: [
'matrixFieldHandle.blockTypeHandle:assetFieldHandle'
]
}) %}
Note that the first two segments are separated by a .
and the second two segments are separated by a :
.
The first part matrixFieldHandle.blockTypeHandle
helps Craft identify where the field you want to eager load is. The final parameter assetFieldHandle
identifies the specific field you wish to get data for.
Image Transform Indexes follow the same syntax as the examples we’ve seen so far, however, they differ in a different way. To eager-load Image Transform Indexes you need to trigger them with a different parameter: withTransforms
. The withTransforms
parameter is unique to assets.
{% set assets = entry.assetsField({
withTransforms: [
'assetFieldHandle'
]
}) %}
You can pre-load transforms by handle, or just by passing the parameters of your transform:
{% set assets = entry.assetsField({
withTransforms: [
'assetFieldHandle'
{ width: 600, height: 400 },
{ width: 600 }
]
}) %}
Above we are using the withTransforms
parameter on our craft.assets
tag. We can also us the withTransforms
parameter when we eager-load data for our Asset fields and Asset fields within Matrix Blocks:
{% set entries = craft.entries({
section: 'news',
with: [
'assetOneFieldHandle',
['assetTwoFieldHandle', {
withTransforms: ['thumb']
}],
['matrixFieldHandle.blockTypeHandle:assetThreeFieldHandle', {
withTransforms: [
{ width: 600, height: 400 },
{ width: 600 },
'highlight',
{ width: 180 },
'thumb'
]
}],
'assetFourFieldHandle',
'assetFiveOneFieldHandle',
]
}) %}
While most of the examples you see for eager-loading involve Entries and Assets and Matrix Blocks, you are not limited to these Elements. Eager-Loading is possible for all Element Types in your templates, including Element Types in third-party plugins.
{% set categories = craft.categories({
group: 'topics',
with: [
'assetFieldHandle'
]
}) %}
{% set tags = craft.tags({
group: 'blogTags',
with: [
'assetFieldHandle'
]
}) %}
{% set users = craft.users({
group: 'authors',
with: [
'assetFieldHandle'
]
}) %}
These examples are all quite simple, but the eager-loading feature behaves the same across all element types, so we apply any of the more advanced examples we’ve looked at above to any of these Elements.
While the craft.entries
tag provides us the with
parameter to eager-load elements, on our individual entries pages, where Craft makes the EntryModel available via an entry
variable, we never have a chance to optimize our Entry query with eager-loading.
What if you have a complicated Entry with lots of Assets and a big, complicated Matrix Field with a hundred Matrix Blocks that you need to load?
The answer to this question is two-fold. First, If you are only querying a single element from the database, there are no additional benefits if you use eager-loading. The addition of the with
parameter will increase the number of queries needed to get your data, potentially leading to a less efficient query to get back a single entry.
Second, while Craft may retrieve your Entry element in the initial query, Craft waits to query the additional data for your Relations fields, Matrix Blocks, and Image Transform Indexes until you attempt to access this information by displaying it in your template. This gives you the opportunity to use eager-loading if you have a particularly large subset of data you will be outputting on the page.
Let’s assume we have an Entry with a big Matrix Field. Here is a basic template for an entry detail page:
{# Entry Detail Page #}
{{ entry.title }}
{{ entry.body }}
Above, we output the entry.title
and entry.body
fields but we never try to display our entry.matrixFieldHandle
so Craft never performs the additional queries that are needed to get back the Matrix data.
When we do decide to display that data, we can use all that we’ve learned above to optimize the query to retrieve that data. Matrix Blocks are an Element Type, so all the same syntax applies.
{# Entry Detail Page with Matrix #}
{{ entry.title }}
{{ entry.body }}
{% set blocks = entry.matrixFieldHandle.find({
with: [
'blockTypeHandle:assetFieldHandle',
'blockTypeHandle:entriesFieldHandle',
['blockTypeHandle:anotherAssetFieldHandle', {
withTransforms: ['thumb']
}]
]
}) %}
{% for block in blocks %}
...
{% endfor %}
Note that our syntax for identifying the items to eager-load within the Matrix field changes slightly from when we were identifying which items to load within the Matrix field from the Entry level above. When eager-loading items from the Matrix field directly, we only have to identify the block type handle and field handle.
In the following example we eager-load data for an Asset Field, Entry Field, Matrix Field, and an Asset Field within our Matrix Field which uses an Image Transform.
{% set entries = craft.entries({
section: 'news',
with: [
'highlightImage',
'featuredThings',
['featuredThings.image:featureImage', {
kind: 'image',
withTransforms: [
'thumb'
]
}],
'relatedEntries',
]
}) %}
{% for entry in entries %}
{{ entry.title }}
{{ entry.body }}
{# Get the eager-loaded asset, if there is one #}
{% set image = entry.highlightImage[0] ?? null %}
{% if image %}
<img src="{{ image.url }}" alt="{{ image.title }}">
{% endif %}
{# Loop through our eager-loaded Matrix blocks #}
{% for block in entry.featuredThings %}
{% if block.type == 'image' %}
{# Get the eager-loaded matrix asset, if there is one #}
{% set thumb = entry.featureImage[0] ?? null %}
{% if thumb %}
{# Get the eager-loaded image transform #}
<img src="{{ image.url('thumb') }}" alt="{{ image.title }}">
{% endif %}
{% endif %}
{% endfor %}
{# Get the eager loaded related entries #}
{% for relatedEntry in entry.relatedEntries %}
{{ relatedEntry.title }}
{% endfor %}
{% endfor %}
Above, you may note that we have to use a different syntax for our assets when we eager load them vs. when we lazy load them in the default way. This is further explained in the docs and is due to eager-loaded elements being returned as an array instead of as an ElementCriteriaModel. Unlike an ElementCriteriaModel, which has several helper methods such as first()
, last()
, and find()
, an array is just an array of data.
We can't access eager-loaded elements in the same way that we access lazy-loaded elements, but we can access lazy-loaded elements in the same way that we access eager-loaded elements.
Lazy-Loaded Elements
{# OK #}
{% set image = entry.assetsField[0] ?? null %}
{# OK #}
{% set image = entry.assetsField.first() %}
Eager-Loaded Elements
{# OK #}
{% set image = entry.assetsField[0] ?? null %}
{# THROWS ERROR #}
{% set image = entry.assetsField.first() %}
The same is true for eager-loaded Matrix blocks, but we don't see a change in the code above because we are using a loop, not accessing a single item.
Lazy-Loaded Elements
{# OK #}
{% for block in entry.matrixFieldHandle %}
...
{% endfor %}
{# OK #}
{% for block in entry.matrixFieldHandle.find() %}
...
{% endfor %}
Eager-Loaded Elements
{# OK #}
{% for block in entry.matrixFieldHandle %}
...
{% endfor %}
{# THROWS ERROR #}
{% for block in entry.matrixFieldHandle.find() %}
...
{% endfor %}
Keep this in mind as you use optimize your templates and share data between templates using includes and macros. It's possible, that if you have eager-loaded data from one page, and lazy-loaded data from another page, that a shared include or macro could throw an error if you are not using a syntax that works for both scenarios.
Everything we have done here in Twig, we can also do in our plugins using PHP. One method of doing so, is to use the with
parameter in the same way we saw in our Twig templates - providing the with
parameter with an array of information about the elements we want to eager load.
$criteria = craft()->elements->getCriteria(ElementType::Entry);
$criteria->handle = 'news';
$criteria->with = array('assetFieldHandle');
$elements = $criteria->find();
While the above appears to be using the with
parameter alongside all the other details of the query, behind the scenes, Craft doesn’t use that information until after the initial query is performed. Eager-loading elements takes place afterwards, with an additional query to the database.
The above is the same as querying for our elements, and then calling a second method (craft()->elements->eagerLoadElements()
) to retrieve the elements you wish to eager load and add them to the source Element Model :
$criteria = craft()->elements->getCriteria(ElementType::Entry);
$criteria->handle = 'news';
$elements = $criteria->find();
craft()->elements->eagerLoadElements($elements, array(
'assetFieldHandle'
));
]]>If you use Alfred, and are always looking for the next way you can save a click, Alfred users can create Custom Searches to search for Craft articles and plugins on Straight Up Craft. Setup only takes a minute and is described in the link above, or the screenshot below:
If you wish to be more specific, you can add custom searches specifically for plugins
or articles
as well by using the section
parameter.
Craft 2.5 gives us several new opportunities in our Craft CMS plugins. Pixel & Tonic has provided a helpful overview of new features that we can now include in our plugins: Updating Plugins for Craft 2.5 .
This article is a collection of some of my notes as our team upgraded a few plugins to 2.5 and take advantage of the new features and UI updates. If you choose to take advantage of some of the new Craft 2.5 UI features like sub-navigation and full page forms, your plugin will need to require Craft 2.5 or higher to work properly.
In Craft 2.5, the Control Panel navigation is removed from the top of the browser page and moves to the right sidebar. It also adds support for sub-navigation which gives us the opportunity to move any top level tab navigation in our plugins to the sidebar.
To add sidebar navigation to your plugin, you can set the subnav
variable in any template that extends Craft’s _layouts/cp
or _layouts/elementindex
templates.
{% set subnav = {
entries: {
label: "Entries"|t,
url: url('sproutforms/entries')
},
forms: {
label: "Forms"|t,
url: url('sproutforms/forms')
}
} %}
If some parts of your nav are only accessible for users with certain permissions, they can be merged in to your subnav
on a conditional basis.
{% if currentUser.can('editSproutFormsSettings') %}
{% set subnav = subnav|merge({
settings: {
label: "Settings"|t,
url: url('sproutforms/settings')
}
}) %}
{% endif %}
The top-level keys in your subnav hash are the values that you will need to display the selected state. In this example, those values can be entries
, forms
, or settings
, and each section has a direct relationship with the second segment in the URL of our control panel section. This allows us to add support for our selected states by setting selectedSubnavItem
to the second segment of the URL:
{% set selectedSubnavItem = craft.request.segment(2) %}
Moving the top-level tab navigation to the sidebar as sub-navigation also helped us simplify breadcrumbs in our plugins to be more specific to the sections they relate to.
If you update your top level navigation from tabs to sub-navigation, all users of your plugin prior to 2.5 will not see any top level navigation in your plugin.
One significant UI and template update in Craft 2.5 is how Save Buttons are handled. Throughout the Control Panel, we no longer see Save Buttons appear at the end of forms, we see them appear at the top right hand side of each form. While, this is a little unintuitive at first from the user perspective, and I’m sure there can be a healthy debate of the usability of such placement, in updating several plugins it was noticeable how much more consistent the placement of the buttons are in this location.
To adopt this convention in your plugins, you’ll need to update your forms to use the new fullPageForm
variable and saveButton
block:
{% set fullPageForm = true %}
{% block saveButton %}
<div class="buttons">
<input type="submit" class="btn submit" value="{{ 'Save'|t }}">
</div>
{% endblock %}
Setting fullPageForm
to true will wrap your entire Control Panel layout area in a Form tag, giving you the flexibility to place the save button higher on the page. In doing so, Craft also handles CSRF protection for you, so you can also remove your previous <form>
and {{ getCsrfProtection() }}
tags.
Where previously, you needed to build your entire form:
{% set content %}
<form method="post" accept-charset="UTF-8">
{{ getCsrfProtection() }}
<input type="hidden" name="action" value="sproutForms/forms/saveForm">
... FORM FIELDS ...
<div class="buttons">
<input type="submit" class="btn submit" value="{{ 'Save'|t }}">
</div>
</form>
{% endset %}
Your template code would now be updated to something like this:
{% set fullPageForm = true %}
{% block saveButton %}
<div class="buttons">
<input type="submit" class="btn submit" value="{{ 'Save'|t }}">
</div>
{% endblock %}
{% set content %}
... FORM FIELDS ...
{% endset %}
On index pages where you may not have a full page form, you can override the extraPageHeaderHtml
variable to place a button in the same location as saveButton
block:
{% set extraPageHeaderHtml %}
<div class="buttons">
<a class="btn submit add icon" href="{{ url('sproutforms/forms/new') }}">{{ "New Form"|t }}</a>
</div>
{% endset %}
Depending on how you were previously using your form tag, make sure you also update any CSS or JS references that may have relied on a custom form id or class that you had on your form tag that Craft may treat differently on its fullPageForm
form tag. You can no longer set custom values on the form element so any CSS or JS that relied on your form tag may need to be handled in another way for now.
Additionally, full page forms can also handle your shortcut redirect behavior for you. The saveShortcutRedirect
variable can be used to set the data-save-redirect
value on your form tag.
{% set fullPageForm = true %}
{% set saveShortcutRedirect = 'sproutforms/forms/edit/{id}' %}
Sidebars Meta has also received some nice updates in Craft 2.5. Previously, the sidebar input fields behaved much like any other form in Craft – stacking labels on top of input fields. If you don’t change anything about your sidebars, they will continue to look this way and work fine.
Classic sidebar panes:
<div class="pane”> ... </div>
Meta sidebar panes:
<div class="pane meta”> ... </div>
But you also have a new option now, which is worth consideration. By adding an additional meta
class to a pane in your sidebar, Craft will collapse the padding within that pane and update fields to place the label and input of a field on a single line. This helps reinforce the relationship between related fields and reduce the amount of vertical space between fields and panes in the sidebar. We found that this update helped simplify and tighten the sidebar UI for multiple plugins.
In addition to UI updates, Craft 2.5 ships with several items that I will call eco-system updates. They are changes that affect the UI, but more importantly, they allow our plugins connect their lives outside of Craft with their lives in Craft.
Craft’s Plugin Settings page now allows you to display a plugin-specific icon, description, and link to documentation.
An icon can be added to display on the plugin page and in the sidebar area by placing two icon svg files in your resources folder:
/pluginname/resources/icon.svg
/pluginname/resources/icon-mask.svg
You can add support for your plugins Description, Documentation URL, Schema Version, and Release Notes by adding the respective methods to your plugin’s primary class file:
public function getDescription()
{
return 'Simple, beautiful forms. 100% control.';
}
public function getDocumentationUrl()
{
return 'http://sprout.barrelstrengthdesign.com/craft-plugins/forms/docs';
}
public function getSchemaVersion()
{
return '2.1.1';
}
public function getReleaseFeedUrl()
{
return 'https://sprout.barrelstrengthdesign.com/craft-plugins/forms/releases.json';
}
Allowing plugins to define a schemaVersion
provides a nice usability improvement where Craft no longer needs to go into “update mode” if a plugin doesn’t require any database updates.
If a plugin provides a Release Feed, Craft will check for any updates you released when it checks for it’s own updates. This makes it easier for us to communicate to users that new versions of software exist and standardizes how we can communicate about the details of those updates, including critical updates.
Depending on how you manage your plugin release notes, you may need to do a little extra work to get them into the proper JSON format. If you store them in something like a Matrix field, you can likely just output them in the correct format. If you use Markdown or another way, you might need to take an extra step to parse reference tags (if you use them) or clean up spacing before outputting your notes as text for the JSON feed.
]]>In your Twig templates, it is often good practice to test if a variable or value exists before trying to display it on your page.
There are several different tests you can use. At first glance, it can be quite confusing which is the appropriate test for your needs. In this article, we’ll take a look at several of your options and identify when each is appropriate to use in your templates.
For an extensive reference on the most common conditional checks and their expected results, see How to check if a variable or value exists using Twig.
As you prepare to output a variable in your template, you need to ask two questions: 1. Does the variable, which holds the value you want to use, exist? 2. If the variable exists, does the variable have a value for you to display?
The most important thing to understand with the defined
test is that it is not checking for the existence of your content, it’s checking for the existence of the variable that holds your content. In the next section, we will go into several ways to test for the existence of content within a variable.
To test if a variable exists, use the defined
test.
{% if currentUser is defined %}
Display the member area
{% endif %}
To test if an attribute exists within a variable, use the defined
test and be sure to use array syntax for your variable:
{% if currentUser['customFieldHandle'] is defined %}
Do something
{% endif %}
Use the defined
test if there is any chance that you may be trying to access a variable or attribute that doesn’t exist.
When you try to use a variable that doesn’t exist in your templates, Twig (or actually, the PHP code that Twig uses to process your template) will throw a warning. Craft does a good job at suppressing these warnings on your live site when devMode
is disabled (but you have higher standards). Enable devMode
to see all the warnings your code is throwing and get them corrected.
You don’t need to test for existence when you know a variable exists and just want to test if the variable has a value (such as a non-blank string, a non-empty array or object, a number greater than zero, or value that returns true).
However, variables may not exist for several reasons. Here’s a partial list of some scenarios when a variable may not exist:
Writing robust code requires planning for what you don’t know and planning for potential changes in your projects that you cannot predict. Becoming comfortable with when you need to test for existence will help you understand the data you are working with more intimately; write clean, DRY code; and create less problems for yourself down the road.
There are more options to choose from when trying to determine if a variable has a value. We use the term value here to mean any type of content that your variable may contain. This includes strings, numbers, arrays, objects, booleans, and null.
The reference How to check if a variable or value exists using Twig gives an overview of four different types of conditional checks that you can use to test if your variable has the content you are looking for.
{# Variable Test #}
{% if variable %} ... {% endif %}
{# Length Filter Test
The length filter returns the number of items in an sequence or mapping or the length of a string. This can help you determine if a variable has a value or not. The results of length filter and empty tests are the same. #}
{% if variable|length %} ... {% endif %}
{# Null Test
The null test will tell you if a variable is null but can give you undesirable results when testing empty arrays or objects, as they will be considered not null #}
{% if variable is not null %} ... {% endif %}
{# Empty Test
Testing if a variable is empty is helpful if you don't know what type of value your variable might have. The empty test evaluates to true if the foo variable is null, false, an empty array, or an empty string #}
{% if variable is not empty %} ... {% endif %}
We can combine the above tests to first check if a variable exists and then confirm the variable has a value:
{% if pageTitle is defined and pageTitle %}
<h1>{{ pageTitle }}</h1>
{% endif %}
{% if pageTitle is defined and pageTitle is not empty %}
<h1>{{ pageTitle }}</h1>
{% endif %}
The above example ensures that we don’t accidentally output any HTML code unless our pageTitle
variable exists and has a value.
There's a misconception that adding HTTPS to your site and serving Amazon S3 files from the same domain is difficult. Viget
So I’ve been using Craft CMS a fair bit lately but one issue I’m running in to over and over again is poorly optimised images being generated by Craft’s image transformation system. Codesion
When potential clients enquire about a website, and require the ability to update their website ( via a Content Management System - CMS) 90% of the time they ask “Do you work with WordPress?” or “I need a WordPress website, can you help?”. When we are asked this we happily say “No”, but then explain that we can offer a better system - In the form of ExpressionEngine or Craft. Made By Shape
When used appropriately it’s advantages include cutting down the initial page load time, keeping visitors interested in your content and interacting with your page. Codesion
Add snippets and template tags for the Craft CMS to Twig & HTML files in Atom. GitHub
When choosing a software for your website it's important to know you're in good company. Seeing other respected businesses choose the same software can signal that software is of high quality, solves similar problems to your needs, and that there is enough demand for the software that it will be well-supported in the future.
Below is a curated list of several recognizable companies who have projects using Craft CMS. This list is not comprehensive and is always changing, so we'll try to update it from time to time. You can find an extended list of Craft Case Studies on the Craft website and projects using Craft CMS in our Project Gallery. If you know of any additional Craft CMS projects from recognized organizations or have thoughts on how we can make this list more useful, send us a note.
When building out websites, it’s common to integrate a Content Management System (CMS) to allow for easy editing and updating of content after the site launch. Design by Cosmic
This guide explains how to launch a website powered by Craft CMS with a proper development environment and workflow behind it. Deploybot
I’ve worked for many years on websites powered by Content Management software such as WordPress, ExpressionEngine and more recently Craft. It’s easy to configure your content structure with these tools using very simple point-and-click control panels. Under the hood these points and clicks translate to changes in the underlying database. DM Logic
Read through the journey of porting Patrol to Craft 3 for a list of notable changes that you might want to be aware of if you’re a Craft plugin developer. Selvin Ortiz
The ultimate Craft CMS setup, development, and deployment guide with Gulp, DigitalOcean, and Capistrano. Gumroad
Learn to set up Mandrill in Craft CMS in minutes with this screencast. Media Surgery
This article will discuss responsive image markup and twig macros to automate generating that markup.
There are three things I hope you will get from this article:
Here are some excellent articles with information on responsive images. If you know nothing about responsive images, read at least one of them, and then come back:
There are a number of responsive image use cases. This article will focus on two, both of which use the img
tag (and not the picture
tag).
The first use case is a fixed-width image (so not actually responsive...) that adapts to different device-pixel-ratios. Say you have a thumbnail image which is always displayed 200px wide, and you have versions for 1x (thumb.jpg) and 2x (thumb_2x.jpg). The markup for this is:
<img
src="thumb.jpg"
srcset="thumb_2x.jpg 2x"
alt="thumb"
/>
Browsers that don't understand srcset
will ignore that attribute, and download thumb.jpg
. Browsers that do understand srcset
will use thumb.jpg
on devices with 1x
resolution, and thumb_2x.jpg
on devices with 2x
resolution (or higher).
The second use case is variable-width images with no art direction (so the only difference in the images is the resolution). Say you have an image that will be full-width on narrower screens (<= 30em), and 25em wide on larger screens. And you have this image available in three different sizes:
The markup for this is:
<img
src="illo_medium.jpg"
srcset="illo_small.jpg 400w, illo_medium.jpg 800w, illo_large.jpg 1000w"
sizes="(maxwidth 30em) 100vw, 25em"
alt="illustration"
/>
Browsers that don't understand srcset
and sizes
will use the 800px version. Browsers that do understand srcset
and sizes
will know from the srcset
attribute that the image is available in those three sizes, and from the sizes
attribute that if the browser window is up to 30em the image will be sized at 100vw
(which is 100% of the viewport width), and otherwise it will be 25em
. At this point it is up to the browser to decide which one to download.
Here is a simple twig macro definition:
{% macro greet(name='World') %}
Hello, {{name}}!
{% endmacro %}
Every macro begins with the {% macro %}
tag, and ends with the {% endmacro %}
tag. This one takes one parameter (name
), which has a default value of 'World'
.
To call it, you first need to import
it.
{% macro greet(name='World') %}
Hello, {{name}}!
{% endmacro %}
{# Import the macro into the file in which it is defined #}
{% import _self as self %}
{# Call your macro #}
{{ self.greet() }}
The example above will generate Hello, World!
. To generate a different output, you can call the macro using a different name
parameter.
{# This will generate `Hello, Dear Reader!` #}
{{ self.greet('Dear Reader') }}
If the macro is defined in a different file than the one where it is called, you import it (in the calling file):
{% import '_macros/_utils' as m_utils %}
{# Call an imported macro using the name you imported it with #}
{{ m_utils.greet() }}
What you name your macro files, and what you import them as are matters of convention. I use self
when the macro is in the same file, and m_whatever
when the macro is in the file _macros/_whatever.twig
.
A lot of the work in creating the responsive image markup can be automated. Rather than uploading the same image at different resolutions, we can use Craft's Image Transformations to generate the various image sizes.
I have a macro file, _img.twig
that has macros for each of the two use cases (available on github). You pass these macros an image asset, and they generate markup for a responsive image.
One thing these macros do is try to be smart about which image transforms to ask Craft for. There is no point in Craft transforming an image larger than the original size. If you have a 400px image, and you need an 800px image, the browser should make that transformation. There is also no point in Craft transforming an image to the same size. If the image is originally 800px, do not transform it to 800px, just use the original image.
_img.twig
defines two public macros (and a third for use only inside the file):
- fixedSize() - Public
- responsive() - Public
- _classAttr() - Internal
fixedSize()
is for the first use case - a fixed size image that adapts to different device-pixel-ratios. Here is an example of using it:
{% import '_macros/_img' as m_img %}
{% set thumbAsset = entry.assetField.first() %}
{# Example of a simple call to the macro #}
{{ m_img.fixedSize(thumbAsset, 200) }}
{# Example of more advanced call
specifying alt attribute of 'some thumb' and class of 'thumb-class'
#}
{{ m_img.fixedSize(thumbAsset, 200, {alt: 'some thumb', class: ['thumb-class']}) }}
responsive()
is for the second use case - a variable width image. Here is an example of using it:
{% import '_macros/_img' as m_img %}
{% set illoAsset = entry.assetField.first() %}
{# Example of a simple call to the macro #}
{{ m_img.responsive(illoAsset) }}
{# Example of another macro call using a different style #}
{{ m_img.responsive(thumbAsset, {style: 'thumb'}) }}
This is not quite all there is to using the responsive()
macro. You also need to define what widths the image should be avaiable in (srcset
), and how wide the image will be displayed (sizes
). Details of that are below.
Here is an annotated version of the twig macro file, _img.twig
. The annotations follow the code they describe.
{% macro _classAttr(classes) %}
{%- if (classes|length) -%}
class="{{ classes|join(' ') }}"
{%- endif -%}
{% endmacro %}
_classAttr
is a macro intended to only be called from within _img.twig
, which is why its name begins with _
(this is a convention of mine, not something the language enforces). If it turns out to have wider utility, I will factor it out into a file of utility macros (and rename it to classAttr
).
_classAttr
takes an array of class names, and returns a class attribute string. _classAttr(['foo', 'bar'])
will return class="foo bar"
. _classAttr([])
will return an empty string. {%-
and -%}
are twig's tag level whitespace control, used to strip out whitespace the macro would otherwise generate. The join filter takes an array of strings and turns it into a string of space separated words.
{% macro fixedSize(asset, width, options={}) %}
{% import _self as self %}
This is the macro for the first use case. It is passed an asset, the width in px
at which the image will be displayed, and [optionally] a hash of options.
Since we are going to use the _classAttr
macro, defined in this file, we import
it.
{% set options = {
alt: asset.altText,
class: []
}| merge(options) %}
We define default options, and merge
them with the options
which were passed in. Options passed in will override these default ones.
The two options are alt
, and class
. alt
will be the alt text for the tag. All my image assets have a field altText
, which is used as the default value. class
is an array of class names, defaulting to none.
{% set transform = {
mode: 'stretch'
} %}
We define the transform we will use. This transform
is missing the width
attribute. When we actually use it, we will merge
in the width
attribute. So to transform to 200: asset.getUrl(transform|merge({width: 200}))
. (The alternative would be asset.getUrl({mode: 'stretch', width: 200})
, but I think using the transform
variable is slightly easier to read).
{% set nativeWidth = asset.getWidth(false) %}
Set nativeWidth
to the original, untransformed width of the image (getWidth(false)
returns the original width).
<img
{# src attr: transformed only if necessary #}
{% if nativeWidth <= width %}
src="{{ asset.getUrl(false) }}"
{% else %}
src="{{ asset.getUrl(transform|merge({width: width})) }}"
{% endif %}
{# srcset attr, but only if 2x <= nativeWidth #}
{% if width*2 == nativeWidth %}
srcset="{{ asset.getUrl(false) }} 2x"
{% elseif width*2 < nativeWidth %}
srcset="{{ asset.getUrl(transform|merge({width: width*2})) }} 2x"
{% endif %}
alt="{{options.alt}}"
{{ self._classAttr(options.class) }}
/>
{% endmacro %}
Here we generate the img
tag. First is the src
attribute, which will be transformed down to the 1x size only if the nativeWidth
is larger than that. Second is the srcset
attribute. There are three cases here:
nativeWidth
exactly matches the 2x size - no transformnativeWidth
is larger than the 2x size - transform it downnativeWidth
is smaller than the 2x size - no srcset
at allFinally, we have our alt
and class
attributes.
{% macro responsive(asset, options={}) %}
{% import _self as self %}
{% set options = {
alt: asset.altText,
class: [],
style: 'default'
}| merge(options) %}
{% set transform = {
mode: 'stretch'
} %}
{% set nativeWidth = asset.getWidth(false) %}
This is the macro for the second use case. It is passed an asset and an options hash. In addition to the alt
and class
values, there is a style
(which defaults to default
).
The style
is used to pick the configuration for a particular style of responsiveness from the config
hash (defined below).
We set options
, transform
, and nativeWidth
just as in fixedSize()
.
{#
# Here is where you configure the image styles.
# You are going to have to modify this for your
# individual site.
#
# config is a hash, where the key is the style,
# and the value is another hash
# of sizes, srcsetWidths, and defaultWidth.
#
# There should always be a 'default' style.
# Redefine the 'default' to whatever makes sense
# for you, and add other styles as needed.
#
# srcsetWidths: image widths that should appear
# in the srcset.
# sizes: media queries that specify the widths
# of the image at different screen widths.
# The first one that matches is used.
# defaultWidth: image width for the src image
# (fallback for browsers that don't understand
# srcset)
#}
{% set config = {
default: {
srcsetWidths: [400, 800, 1000],
sizes: [
'(max-width: 30rem) 100vw',
'25em'
],
defaultWidth: 800
},
thumb: {
srcsetWidths: [200, 400],
sizes: [
'200px'
],
defaultWidth: 200
}
} %}
config
will need to be modified for your particular project. Here is where you specify the widths for srcset
and the values for sizes
. This default
style is the same as the one from the illo
example earlier in the article. The thumb
style is another way of doing the 200px fixed width thumbs.
{% set params = config[options.style] %}
config
defines multiple sets of style params. Fetch the one we will use.
{% set srcset = [asset.getUrl(false)~' '~nativeWidth~'w'] %}
srcset
will be an array of strings (we will use join
to turn them into one comma separated string later). Here we initialize the array with a single string for the nativeWidth
image, which is always included. ~
is twig's concatenation operator. We concatenate the image url, a space, the width, and the string w
, and set srcset
to an array of just that string.
{% for width in params['srcsetWidths'] %}
{% if width < nativeWidth %}
{% set srcset
= srcset|merge([asset.getUrl(transform|merge({width: width}))~' '~width~'w'])
%}
{% endif %}
{% endfor %}
Here we loop over the srcsetWidths
, and add the width string to the srcset
array for any that are less than the nativeWidth
.
<img
{# src attr: transformed only if necessary #}
{% if nativeWidth <= params['defaultWidth'] %}
src="{{ asset.getUrl(false) }}"
{% else %}
src="{{ asset.getUrl(transform|merge({width: params['defaultWidth']})) }}"
{% endif %}
srcset="{{ srcset|join(', ') }}"
sizes="{{ params['sizes']|join(', ') }}"
alt="{{options.alt}}"
{{ self._classAttr(options.class) }}
/>
{% endmacro %}
Here we generate the img
tag. First is the src
attribute, which will be our defaultWidth
if the image is large enough, and otherwise the nativeWidth
. After that is the srcset
attribute, where we join
the srcset
variable, this time putting ", "
between the strings. Then the sizes
attribute, similarly constructed with join
. And finally the alt
and class
attributes.
<script src="{{siteUrl}}js/vendor/picturefill.min.js" async></script>
true
in my config/general.php
:'generateTransformsBeforePageLoad' => true,
This generates the transform when getUrl()
is called, rather than waiting for the browser to request the image. This will make the first page load a little bit slower, but it lets you cache
the result of calling the macros.
You will need to specify the config
styles for the responsive()
macro, but you can wait to fill in the details of the styles until your site design is quite solid. And these values never have to be completely precise. Reasonably close is fine (though you probably want to get the breakpoint values exact).
Enjoy! Feel free to contact me with any questions: marion.newlevant@gmail.com.
Most clients want a blog or some similar component of their website that lets them add content on a periodic basis. Zack Spear
One approach I find useful when developing Craft plugins is to think of the plugin as a client of its own API. Not only does this force me to concentrate on the core functionality of the plugin right from the get-go, it also changes my perspective on what a plugin actually is. Stephen Lewis
In these instructions I’ll explain the basics of how I handle AJAX page transitions for Craft CMS using history.pushState. Zack Spear
Dependency conflicts between Craft plugins are a thorny problem, not of Craft’s making. In very specific circumstances, we can sidestep these issues by using “global” plugin dependencies. The rest of the time, the best we can do is err on the side of caution, and fail gracefully. Stephen Lewis
Special guest Andrew Welch joins the show to help us take a deeper look at Twig, the templating language for Craft CMS. We discuss some of the features that developers should consider for more efficient development, namely filters and macros. CTRL+CLICK CAST
I live and work in Belgium, a country with three official languages. Multilingual websites are quite a common sight around here. Here is what I learned along the way after building a few of those using Craft CMS. Jérôme Coupé
When writing a Craft plugin, you should be very selective about what you put in your service classes. If you’re developing a very simple Craft plugin, chances are you won’t need to worry about its public footprint. For more complex projects, the techniques described in this article will make your plugin easier to test, and ensure that it is only used in the manner you originally intended. Stephen Lewis
Over the past couple of years I've been working a lot with Craft CMS and Twig. There was an existing PHP-Twig Textmate bundle which was a good starting point but there were several Craft-specific improvements I wanted to make... Ben Parizek, Barrel Strength Design
In this post, take a quick look at how we moved from Wordpress to Craft CMS and how we think it will help make both our website and services even better. Bluegg
For the past year and a half Craft CMS has been our go to CMS when building sites. Recently we launched a Craft site on a MediaTemple shared server and felt that we could share how we got the code on the server and how we update the code without needing to FTP. Zack Spear, Design by Cosmic
Ben Croker, the author of Craft Plugin Development, recorded a free bonus update to his course. The update covers some initial considerations for making your plugin Craft 3 compatible. Ryan Irelan
Everything you need to know about using PSR-4 autoloading in your plugins. Stephen Lewis
If you're new to Craft CMS, you're in for a treat. Below, we've collected a list of links to help you get started understanding Craft's Core Concepts, find key resources, and connect with the community.
When you're ready to get a bit deeper, check out:
Several things are changing about Plugin Development in Craft 3.
If you're getting into Craft plugin development, you'll quickly learn there is a wealth of power you can extend and take advantage of in your plugins. Much of this power comes from Craft's javascript libraries which remain largely undocumented. Here are a few resources that can help get you started.
For developers who want more control and performance than WordPress offers, Craft CMS offers a compelling solution. In this tutorial, I'll introduce you to Craft CMS and summarize its core features. Jeff Reifman, Tuts+
These slides explain the Twig templating language, used by Craft CMS, for designers and developers. Brandon Kelly
Search the official Craft CMS class reference using Alfred. Mats Mikkel Rummelhoff
Here's some documentation for create Craft plugins specifically intended to be run from the command line. In this blog post, Mike demonstrates how to set up a console plugin and invoke it from the command line. Mike English, Atomic Object
A podcast for people who use Craft CMS. Craft Podcast
We'll take your content strategy and create a content model that reflects your strategy in the CMS, making it easier and more efficient for your authors, for a better return on investment of your website, and saving time and effort for the long term. 3 Red Kites
Craft Link List is a curated publication collecting interesting links about Craft CMS.
Dieses Tutorial dreht sich um die Twig Basics - Essentiell für alle die Templates für Craft programmieren. Sascha Fuchs
Brandon Kelly explains the development changes coming to Craft 3 in this 80-minute workshop recorded at Peers 2015.
The Future of Plugin Dev from Craft CMS on Vimeo.
To help refer back to points in the video, here are are the time markers for the topics covered:
17:26 - Example of class member access on instantiation
18:40 - What has changed in Yii?
45:34 - Internationalization
46:00 - What has changed in Craft?
This workshop was given by Ben Parizek at Peers 2015. Footnotes have been enabled in the Presentation linked below if you would like to review the slides or workshop resources.
Workshop Description
Craft CMS gives you an exceptional amount of control to balance design freedom, a flexible content architecture, and powerful management features for content strategists. In this workshop we will explore Craft's wide range of tools to help manage your content strategy.
We'll discuss Craft Element Types from Entries, Assets, and Users to Categories, Globals, and Matrix Blocks; explore content architecture choices for repeat and one-off content, hierarchical content, and content with advanced layouts; and see how these decisions affect your publish workflows and connect to your Twig templates.
Whether you're a designer, developer, or content strategist, Craft CMS makes it easy to impress and is a pleasure to work with as you build beautiful, content-rich websites.
]]>Slides from "Programming in Twig", presented at the 2015 Craft CMS Summit from Environments for Humans. Marion Newlevant
Brandon is the founder of Pixel & Tonic, creators of Craft CMS. Product + Support spoke with him about getting into the CMS business, supporting customers, and building a community. Ian Landsman
One of the most important deliverables for any successful branding project is a Brand Guide that sets the rules and standards for working with the system that has been developed. In late 2014, we worked to streamline this process by moving it entirely over to Craft CMS. Stu Smith, Sputnik Creative
Craft CMS comes with a Matrix field that allows you to set up repeatable "blocks" of content for storing data. Using the blocks below you can create robust, flexible layouts that will replace your WYSIWYG. Stephen Bowling
With Craft and the picture element, you can display images optimized for different breakpoints and have more control over your responsive layouts. You'll need Picturefill to enable the picture element in browsers that don't support it natively. If you aren't familiar with the picture element, the Picturefill site does a great job of explaining the markup and its features. Stephen Bowling
A website for the German Craft CMS community. craft.entries
Even though Twig is just (just) a templating engine for PHP applications (like the super smooth Craft CMS), it can also do lots of “programmy” things on its own, too. Ryan Irelan
Macros are the Twig version of functions. Just like you would write a function in PHP to do something and return something, you can use a Twig macro to generate some output. Ryan Irelan
Twig doesn’t refer to a key, value array as an array. It calls it a hash. Mijingo
We’re a design and web development agency that primarily focuses on small businesses and NGOs. That means content heavy sites, with a few extra features sprinkled in. Zoltan Varady
Propose and vote on features for Craft CMS Pixel & Tonic
Report minor bugs and unexpected behavior in Craft CMS. Pixel & Tonic
Templating in Craft using Twig can, at first, be a little confusing. If you, like me, come from other systems that have a proprietary template tag system, then it might take a little time to wrap your head around how Craft and Twig work. Ryan Irelan
Meet Craft CMS. It's sublime. We've used it on a few projects now and more and more, we want to use it for all the things. We just finished a big, custom eCommerce Craft website that would have been a nightmare with most any other CMS. But Craft let us spend more time delighting the client and less time fighting software. We delivered a better product, in less time, and with less effort. The client couldn't be happier. What’s not to love? Nathan Huening
This repo contains all of the templates, front-end resources, and a MySQL DB dump for Happy Lager, a Craft demo site. Pixel & Tonic
I've wanted to give Craft CMS a go for a while now and figured the best way to do it is with a personal project. My photo blog is in dire need or a revamp and as such I've decided to migrate to Craft. Caffeine Creations
If you want to work with Craft Client or Craft Pro but – for one reason or another – don't have the appropriate Craft license, Craft supports a way to test out its full features without pulling out your wallet. To get access to Craft Client or Craft Pro for Free, you'll need to take a few steps.
You can use craft.dev
alone or as part of a subdomain. All of these examples should work fine to get Craft Client or Pro setup for free:
Once you have the proper domain setup, you will still need to take another step to enable the free version of Craft Client or Craft Pro. Just like you are going to purchase Craft, click on "Upgrade Craft to take your site to the next level" and instead of an option to purchase Craft, you will now see an option to test Craft Client or Craft Pro.
You can work with the test versions of Craft Client or Craft Pro as long as you want. When you migrate your site to a new domain, you will be prompted to downgrade or purchase the appropriate license.
Note: If you want to quickly toggle between the Craft Client and Pro editions, once you are running on a whitelisted craft.dev
domain, you can toggle the Craft edition by updating the number in the edition
column in the craft_info
database table.
Craft is a young and very capable CMS created by Pixel & Tonic. Craft is developed using open source technologies like PHP and MySQL and is based on a PHP framework with a great track record: Yii. Jérôme Coupé
Developer Marion Newlevant and top Craft CMS StackExchange contributor stops by the show to explain the Twig templating language that powers Craft CMS. We compare Twig to other templating and programming languages, discuss DRY approaches to Craft and dive into macros, includes, extends, and embeds! We share learning resources as well as common Twig mistakes and what could be better explored in documentation. CTRL+CLICK CAST
A series of UK workshops focussed on the übercool CMS Craft. Craft Work
This plugin demonstrates how to create a new Task in Craft. Pixel & Tonic
I wanted to share my basic .gitignore file for when I'm working on a Craft CMS project. Sometimes I use CodeKit, sometimes I don't but this .gitignore file will take care of CodeKit cache just in case. John Morton
Craft provides several powerful options for you to retrieve content in templates and in plugins. Let's take a look how to query our Entries and other Elements in Twig and in PHP.
In your Twig templates, there are multiple ways you can retrieve your Entries content.
{# Access your Entries using chained parameters. #}
{% set entries = craft.entries.section('sectionHandle').limit(10) %}
{# By default, the craft.entries tag uses the find() method.
The line above and this line will behave in the same way. #}
{% set entries = craft.entries.section('sectionHandle').limit(10).find() %}
{# If you only need to fetch a single Entry from the database,
you can use the first() or last() function #}
{% set entries = craft.entries.section('sectionHandle').limit(10).first() %}
{% set entries = craft.entries.section('sectionHandle').limit(10).last() %}
{# If you prefer, you can place each parameter on it's own line #}
{% set entries = craft.entries
.section('sectionHandle')
.limit(10)
%}
Craft also allows you to use Object Syntax for retreiving your Elements. You can choosed Chained Parameters or Object Syntax based on your preference or what works best for your situation.
{# With Object Syntax, you can define your parameters first #}
{% set params = {
section: 'sectionHandle',
limit: 10
} %}
{# And then use your parameters by passing them to your Entries tag #}
{% set entries = craft.entries(params) %}
{# You could also just set your Object parameters directly within your Entries tag #}
{% set entries = craft.entries({
section: 'sectionHandle',
limit: 10
}) %}
{# Object Syntax is useful if you need to reuse parameters #}
{% set params = { section: 'sectionHandle' } %}
{% set entries = craft.entries(params) %}
{% set totalEntries = craft.entries(params).total() %}
{# You can combine Object Syntax together with Chained Parameters #}
{% set entries = craft.entries(params).limit(10) %}
When you define the content you want to retreive from your database - whether you know it or not - you're building an ElementCriteriaModel
. The ElementCriteriaModel
sounds intimidating, but is easier to use than it sounds. You can think of the ElementCriteriaModel
as a set of rules about what you want to retrieve from the database – specifically rules about the type of Elements you want to retrieve. In all of our above examples we've been looking at the Entry Element, but we can also use the ElementCriteriaModel
to define criteria about other types of Elements we want to retrieve as well.
When we define our rules about which Entry Elements we want to grab from the database, we use the craft.entries
tag. If we want to retrieve User Elements, we would use the craft.users
tag. For Asset Elements, use the craft.assets
tag, and so on.
We build an ElementCriteriaModel
before we retrieve data from the database. After our data is returned, we get an Element Model or array of Element Models to work with. In our example above, our Element Model is an EntryModel
. If we were querying User Elements, it would be a UserModel
. If we were querying Asset Elements it would be an AssetFileModel
.
Let's review an example from the Entry tag we've been exploring above:
{% set entries = craft.entries.section('sectionHandle').limit(10) %}
{% for entry in entries %}
<a href="{{ entry.url }}">{{ entry.title }}</a>
{% endfor %}
A closer look at the code:
.section('sectionHandle').limit(10) | The parameters we use along with the craft.entries tag will be used by the craft.entries tag to build our ElementCriteriaModel . By default, when it is used, the craft.entries tag will call the ElementCriteriaModel 's find() function to retrieve all data that matches the rules defined by your parameters, and any default rules set by Craft.
|
craft.entries | Our craft.entries tag requests the data from the database that we described in our parameters.
|
{% set entries = ... %} | We assign the results of our database query to the entries variable in our template using the Twig set tag. The results of our database query are an array of EntryModel s.
|
{% for entry in entries %} ... {% endfor %} | Using a Twig for loop, we loop through the array of EntryModel s returned.
|
<a href="{{ entry.url }}">{{ entry.title }}</a> | For each time we loop through in our results, we can access the data of the specific EntryModel we have access to during that cycle of the loop.
|
You can also retrieve Entry content from your database in a Craft plugin using PHP. To do so, we use the same method that is used behind the scenes when we use the craft.entries
tag in our Twig templates.
// We can create the same query we saw above in our Twig templates like this
$criteria = craft()->elements->getCriteria(ElementType::Entry);
$criteria->section = 'sectionHandle';
$criteria->limit = 10;
// Get all entries that match
$entries = $criteria->find();
// Get the first entry that matches
$firstEntry = $criteria->first();
Here are a few more examples with other Element Types to illustrate the similarities between using the ElementCriteriaModel
to query each Element Type.
// Retrieve Categories from the Category Group "flora"
$criteria = craft()->elements->getCriteria(ElementType::Category);
$criteria->group = 'flora';
$categories = $criteria->find();
// Retrieve all fields in our Global Set named "header"
$criteria = craft()->elements->getCriteria(ElementType::GlobalSet);
$criteria->handle = 'header';
// Each Global Set is a single Element, so we can retrieve our data by calling first()
$headerGlobals = $criteria->first();
// Retrieve all Matrix Block Elements associated with a specific Field
$criteria = craft()->elements->getCriteria(ElementType::MatrixBlock);
$criteria->fieldId = $fieldId;
$matrixBlocks = $criteria->find();
To build your own Element queries, create an ElementCriteriaModel for the Element Type you wish to query, and define the criteria that you want to use to query the database. You can explore the available parameters you can add to your queries via the models in the Variables section of the Templating Reference in the Craft docs or via the specific Element Models in the Class Reference.
craft.entries
tag in templates and craft()->elements->getCriteria()
in PHPWhile we've kept the above examples simple, here is a comparison of a more advanced craft.entries Twig Tag and equivalent code in PHP.
{# Retrieve the most recent 10 entries from the 'articles' section
that have a postDate before today and which are authored by
the author who matches authorId '1' #}
{% set entries = craft.entries({
section: 'articles',
authorId: 1,
postDate: '<=' ~ (now.date),
order: 'postDate DESC',
limit: 10
}) %}
// Do the same in PHP
$criteria = craft()->elements->getCriteria(ElementType::Entry);
$criteria->section = 'articles';
$criteria->authorId = 1;
$criteria->postDate = '<=' . date("Y-m-d");
$criteria->order = 'postDate DESC';
$criteria->limit = 10;
$entries = $criteria->find();
Whether you’re familiar with Forge but not Craft, or familiar with Craft but not Forge, it’s worth checking out how simple it is to get a powerful Craft-based site up and running in Laravel Forge. Matt Stauffer
If the title didn’t give it away — Anyone who wants to set up a local development environment using Laravel Homestead 2.0 to develop Craft CMS sites. Matt Collins
In Craft, the process of creating global content has been standardized using the Global Set Element Type otherwise known as Globals. I want to propose another way of doing so without having to create any global sets, field layouts, or having to log into your dashboard... Selvin Ortiz
A docset for Craft CMS to use with Dash. Cole Henley
Choosing the right content management system (CMS) for your website – and your budget – is one of the most important decisions in the web development process. To help illustrate the differences, we’ve put together this visual guide examining what makes some of our favorite affordable CMS options unique. Caleb Newby
Craft gives us the option to force any particular user to reset their password the next time they login. If you ever need to to force all users to reset their password on a larger site where manually updating each user is not feasible, you might have to do so at the database level.
To force all users to update their password the next time they login, you'll need to set the passwordResetRequired
field for each user to true
. You can do so with a query like the following:
UPDATE craft_users
SET passwordResetRequired = 1;
If you only want to force admin users to reset their password, you can limit your query to only affect admin users:
UPDATE craft_users
SET passwordResetRequired = 1
WHERE admin = 1;
Please be careful when performing updates directly to the database. Some databases may be configured differently and have a different prefix, and in general you should test anything you do on a development database before doing it to the live site.
]]>Using Twig to manipulate Craft's ElementCriteriaModel objects makes for leaner and meaner templates. Relatively complex functionalities can also be built pretty easily. Jérôme Coupé
Craft is better than WordPress for more custom websites because developers can build instead of manipulate. This philosophy applies to creating the admin, content entry, and templating... Megan Zlock
Setting up Fastly to work with Craft takes some time the first go-round, but the performance difference is more than worth the trouble. Layer Tennis went from an average HTML load time of 2.1 seconds without caching to less than 120 milliseconds. That's a reduction of 1,750%... Chris Maven
Sometimes the order of things matters. This article begins to explore how Twig Templates in Craft CMS are processed. We'll take a look at the order in which the set
, block
, extends
and include
tags get evaluated and rendered. Understanding the logic behind how the page is processed will help you decide when to use these tags; whether you should be using these tags in your layouts, page templates, or partials; and know when you need to consider alternative methods to pass variables between your templates more easily when dealing with more advanced templating needs.
Our example uses a common pattern we see in Craft. Our page load will include a layout
template, a page
template that extends that layout, and an partial
template that is included in that page template. Let's output the full versions of our example templates we'll be working with so we can easily refer back to them once we get into the details. The content of these templates is designed to help us test the order that we see things being output.
Layout Template (_layout.html)
Our Layout Template will not be used directly. We can set variables or fallback values in the Layout Template, but most content that will be rendered in it will be defined when we extend the Layout Template with our Page Template.
<html>
<head>
<title></title>
</head>
<body>
{# Set a variable in our layout template #}
{% set setLayoutContentVariable = 'Set Content from Layout Template' %}
{# Output block tag content in our layout template #}
{% block blockContent %}
<p>Block Content in Layout Template</p>
{% endblock %}
{# Output set tag content in our layout template #}
{% if setLayoutContent is defined %}
{{ setLayoutContent }}
{% endif %}
</body>
</html>
Page Template (page.html)
Our Page Template is where most of our content is defined. To reuse content or simplify the complexity of our Page Template, we can include Partial Templates.
{# Extend our layout template #}
{% extends "_layout" %}
{# Set a variable in our page template #}
{% set setPageContentVariable = 'Set Variable in Page Template' %}
{# Output block tag in our page template #}
{% block blockContent %}
{# Set a variable within our block tag #}
{% set setBlockContentVariable = 'Set Content from Block Tag in Page Template' %}
{# Output content in our block tag #}
<p>Block Content in Page Template</p>
{# Output a variable from our layout template within our block tag #}
{% if setLayoutContentVariable is defined %}
<p>{{ setLayoutContentVariable }}</p>
{% endif %}
{# Output a variable from our page template within our block tag #}
{% if setPageContentVariable is defined %}
<p>{{ setPageContentVariable }}</p>
{% endif %}
{# Output the content of our parent block tag #}
{{ parent() }}
{# Include another template in our block tag #}
{% include '_partial' with {
setLayoutContentVariable : setLayoutContentVariable
} %}
{% endblock %}
{# Output set tag in our page template #}
{% set setLayoutContent %}
{# Output content in our set tag #}
<p>Set Content in Page Template</p>
{# Include another template in our set tag #}
{% include '_partial' %}
{% endset %}
Partial Template (_partial.html)
Our Partial Template can be re-used in multiple places. Most content output within the Partial Template is usually specific to the problem being solved in the Partial Template, but the content within it can originate from several different places.
{# Output content in our include template #}
<p>Content in Partial Template</p>
{# Output a set variable from our layout, that was handed
off to our partial template using the `with` statement
of the include tag #}
{% if setLayoutContentVariable is defined %}
{{ setLayoutContentVariable }}
{% endif %}
{# Output a set variable from our page where this partial was included #}
{% if setPageContentVariable is defined %}
{{ setPageContentVariable }}
{% endif %}
{# Output a set variable from the block tag where this partial was included #}
{% if setBlockContentVariable is defined %}
{{ setBlockContentVariable }}
{% endif %}
When we load page.html
from the above templates, what order do the tags in our three templates _layout
, page
, and _partial
get processed?
The answer is straightforward, but not obvious. Some parts of the page
template are processed before the layout
template and some are processed after. Some of our variables in the layout
and page
templates are immediately available to the included partial
, other variables are not.
In the following steps, Content refers to any text content being output on the page directly: "Hello World". Twig tags refer to any Twig tags {{ output tags }}
or {% action tags %}
.
While the processing of our complete Page Template
will step back and forth between all of our templates; content and all Twig tags always get processed from top to bottom within the template or template partial (such as an {% include %} template) that is being evaluated. The only exception to this is the {% block %}
tag, which gets processed last.
Let's take a look at what order our templates get processed when we load page.html
.
{% set %}
tags that were processed in the Page Template
are available to the Layout Template as it is processed{% block %}
tag is processed in the Layout Template
, Twig first looks for the overriding {% block %}
tag in the Page Template
and processes that first. If the {% block %}
tag in the Page Template
doesn't exist or calls the parent()
functions, then (and only then) does the {% block %}
tag in the Layout Template
get processed.include
tag we immediately have access to variables from the same context in Twig. In our case, the {% block %}
tag is in our Page Template
so our variables created in the Page Template
(setPageContentVariable
) and within the {% block %}
tag of the Page Template
(setBlockContentVariable
) are available to use in the Partial Template
. If we wish to use a variable in our that was created higher on the page in the Layout Template
(such as setLayoutContentVariable
) then we have to explictly tell our Partial Template
to make it available. We can do so using the include
tag's with
keyword ({% include ... with ... %}
).A few things to note:
Some Twig tags don't output anything. Tags can have varied behaviors. In our example above, the {% extends %}
tag tells Twig to continue and process the Layout Template
once it's completed processing all of the other tags in the Page Template
.
A common practice is to use the {% set %} ... {% endset %}
and {% block %} ... {% endblock %}
tags to output blocks of content in templates. One reason to chose {% set %}
or {% block %}
may be because they provide different features. Another reason, which is more clear as we consider the tags in the processing order above, may be because they get processed at different times during the page load.
With those steps laid out. Let's take a closer look at each step and the specific Twig code the step is processing.
Page Template (page.html)
Our process kicks off with all items in our Page Template
except the {% block %}
tags
{% extends "_layout" %}
{% set setPageContentVariable = 'Set Variable in Page Template' %}
...
{% set setLayoutContent %}
<p>Set Content in Page Template</p>
{% include '_partial' %}
{% endset %}
Partial Template (_partial.html)
The {% include '_partial' %}
tag of the Page Template
gets evaluated with the available variables. Note that the setLayoutContentVariable
that we output in our {% block %}
tag later is not available at this point as we haven't processed anything in the Layout Template
yet.
<p>Content in Partial Template</p>
{% if setLayoutContentVariable is defined %}
{{ setLayoutContentVariable }}
{% endif %}
{% if setPageContentVariable is defined %}
{{ setPageContentVariable }}
{% endif %}
{% if setBlockContentVariable is defined %}
{{ setBlockContentVariable }}
{% endif %}
Layout Template (_layout.html)
After the Content and Twig tags in our Page Template
are processed, the Content and Twig tags in the Layout Template
referenced earlier in our extends
tag will get processed.
<html>
<head>
<title></title>
</head>
<body>
{% set setLayoutContentVariable = 'Set Content from Layout Template' %}
...
{% if setLayoutContent is defined %}
{{ setLayoutContent }}
{% endif %}
</body>
</html>
Page Template (page.html)
While we are technically processing the Layout Template
at this point, the first tag we find in the Layout Template
that has not been processed at this point is the {% block %}
tag, and the block tag will first evaluate the overriding {% block %}
tag in the Page Template
.
{% block blockContent %}
{% set setBlockContentVariable = 'Set Content from Block Tag in Page Template' %}
<p>Block Content in Page Template</p>
{% if setLayoutContentVariable is defined %}
<p>{{ setLayoutContentVariable }}</p>
{% endif %}
{% if setPageContentVariable is defined %}
<p>{{ setPageContentVariable }}</p>
{% endif %}
{{ parent() }}
{% include '_partial' with {
setLayoutContentVariable : setLayoutContentVariable
} %}
{% endblock %}
Layout Template (_layout.html)
As we process the {% block %}
tag in our Page Template
we come across the parent()
function which evaluates the content of the {% block %}
tag in the parent Layout Template
.
{% block blockContent %}
<p>Block Content in Layout Template</p>
{% endblock %}
Partial Template (_partial.html)
The {% include '_partial' %}
tag appears within the {% block %}
tag of our Page Template
as well. At this point, new variables are available so the output of this template differs from the output we get when this Partial Template
earlier when we processed the set tag.
<p>Content in Partial Template</p>
{% if setLayoutContentVariable is defined %}
{{ setLayoutContentVariable }}<br/>
{% endif %}
{% if setPageContentVariable is defined %}
{{ setPageContentVariable }}<br/>
{% endif %}
{% if setBlockContentVariable is defined %}
{{ setBlockContentVariable }}<br/>
{% endif %}
Note: {% block %}
tags and {% set %}
tags and all of the tags that get output within them can be reordered. So as you review the above, it's important to note at what point in time they are evaluated in the context of the {% extends %}
and {% include %}
tags. Within the same template multiple {% block %}
tags and {% set %}
tags can appear an various orders, with various orders of the tags within them, and the specific order of your situation will determine what variables are available and when. It's not as simple as "all {% set %}
variables will be available when {% block %}
tags are finally processed". That's not true. Some {% set %}
variables are more specific than others and will only be available after a {% block %}
tag begins to process.
As we've explored in the example above, the Twig processing order flows down the page. Variables are processed and become available farther down the page to be output. Sometimes however, we can only determine a value farther down the page, and the value itself needs to be output higher on the page.
Out of the box, some scenarios like this can be handled by Twig but things can get messy quick, and code that once felt dry can begin to feel harder to maintain. Other scenarios simply can't be solved without extending Twig or managing your variable with the help of a plugin.
This article won't go into these situations in a lot of detail, but here are a few ways you can begin to explore if you run into this situation.
This article provides a way to start thinking about the order of events in your Twig Templates. Surely, there are more situations to discuss where the order of things will matter in order to set variables, perform logic, and output content into your templates.
If you'd like to explore the processing order in your templates on your own, you can download the example templates described above for the set and block example along with a utility plugin called Sprout Log. Sprout Log is just a wrapper for the plugin-specific Craft::log()
method but can be used in your templates to help determine in what order items are being processed. Logged items will be output in the craft/storage/runtime/sproutlog.log
file.
In the 5 part series linked below, Stephen Lewis from Experience provides a nice overview and deep dive of Validation in Craft and how it relates to the underlying validation in Yii.
Part 1: Foundations
If you’re working on a Craft plugin that accepts user input, chances are you’ll want to validate that data...
Part 2: AttributeTypes
This instalment is all about Craft’s AttributeTypes: what they are, what they do, and which ones are available.
Part 3: Attribute Rules
This instalment is all about attribute rules: what they are, how they affect validation, and which ones are available.
Part 4: Hidden Validator Settings
This instalment is all about “hidden” validator settings, which aren’t accessible via the usual Craft attribute rules.
Part 5: Custom Validators
This instalment is all about implementing your own custom validators.
Craft’s solution for longform content is the Matrix field. With Matrix, developers have the flexibility to provide custom fields to be used for content entry, and can write custom templates (using Twig, in Craft’s case) to be used to render that content... Anthony Colangelo
Update: The content from spreadsheet below is now also available as the Craft CMS Field Guide.
The spreadsheet Example Twig code for all default Craft fields outlines simplified output code for all of Craft's default field types and how they fit into three different tasks we run into again and again in our Twig templates:
This content was prepared for the talk 'Twig for Designers' by Ben Parizek at the first annual Craft CMS Summit and covered similar concepts that you will find in the post Twig Quick Start and Twig Templating Key Concepts.
]]>Use the power of Craft and Twig to create a context-focused templating system that is as flexible, powerful, and manageable as you need. Anthony Colangelo
When working and starting on multiple projects simultaneously, its always a good idea to have something to start from. Jake Chapman
Foundation Interchange and Craft image transforms combined, make responsive images easier than they ever have been. Naomi Royall
Learn Twig without any prior programming experience. Brandon Kelly
A step-by-step guide to implementing Craft and Shopify. Trevor Davis
By default, when you setup a multi-environment config, Craft compares the key in your multi-environment config array to the PHP $_SERVER['SERVER_NAME']
variable to test which environment matches. If the key in your array is contained within the $_SERVER['SERVER_NAME']
variable, Craft considers the option a match.
If you want to be more explicit, you can define each of your environments using the CRAFT_ENVIRONMENT
variable in your index.php
file and assign each environment a short, keyword for each of your environments.
<?php ## public/index.php
// Check the SERVER_NAME variable ourselves
switch ($_SERVER['SERVER_NAME'])
{
// If the SERVER_NAME variable matches our case,
// assign the CRAFT_ENVIRONMENT variable a keyword
// that identifies this environment that we can
// use in our multi-environment config
case 'straightupcraft.com' :
define('CRAFT_ENVIRONMENT', 'live');
break;
case 'dev.straightupcraft.com' :
define('CRAFT_ENVIRONMENT', 'dev');
break;
default :
define('CRAFT_ENVIRONMENT', 'local');
break;
}
?>
You can then use the keywords you've defined in your multi-environment config setup in your craft/config/general.php
and craft/config/db.php
files.
<?php ## craft/config/general.php
return array(
'*' => array(
// Config overrides for all of our environments
),
'live' => array(
// Config overrides for our live environment
),
'dev' => array(
// Config overrides for our dev environment
),
'local' => array(
// Config overrides for our live environment
),
);
?>
Craft has sensible defaults that work well, so how you customize your general.php files is based on your personal preference. You can override default config settings or create custom variables that fit your needs. If you choose to customize your settings, below are a handful of examples of some settings that may be useful to consider changing in different environments.
<?php ## craft/config/general.php
/**
* General Configuration
*
* This example multi-environment config file is a
* collection of several possible use cases for your
* multi-environment workflow
*/
// Ensure our urls have the right scheme
define('URI_SCHEME', ( isset($_SERVER['HTTPS'] ) ) ? "https://" : "http://" );
// The site url
define('SITE_URL', URI_SCHEME . $_SERVER['SERVER_NAME'] . '/');
// The site basepath
define('BASEPATH', realpath(CRAFT_BASE_PATH . '/../') . '/');
return array(
// Config settings for ALL environments
// ------------------------------------------------------------
'*' => array(
// We can use these variables in the URL and Path settings within
// the Craft Control Panel. i.e. siteUrl => {siteUrl}, basePath => {basePath}
'environmentVariables' => array(
'siteUrl' => SITE_URL,
'basePath' => BASEPATH
),
// We can append this value to our CSS and JS files
// so we can cachebust them all if we need to.
// <link rel="stylesheet" href="/css/style.css?v={{ craft.config.cacheBustValue }}" />
'cacheBustValue' => '20121017',
// Create a custom variable that we can use for an environment conditional
// We set the environment in index.php: live, dev, or local
// This setting assumes we set the environment name in our index.php file
// {% if craft.config.env == 'live' %} ... {% endif %}
'env' => CRAFT_ENVIRONMENT,
// Triggers
// If you wish to access the control panel via a different URL
// or change your page trigger for pagination, you can do so here.
'cpTrigger' => 'admin',
'pageTrigger' => 'p',
// User account related paths
// Depending on your user needs, you may want to adjust several
// of the available user settings to customize your users workflow
// for logging in, changing a password, or being activated
'loginPath' => 'members',
'logoutPath' => 'logout',
'setPasswordPath' => 'members/set-password',
'setPasswordSuccessPath' => 'members',
'activateAccountSuccessPath' => 'members?activate=success',
'activateAccountFailurePath' => 'members?activate=fail',
),
// Config settings for the LIVE environment
// ------------------------------------------------------------
'live' => array(
// Setting allowAutoUpdates to false will disable the
// ability to use the one-click update feature. This might
// be useful if you are managing a git workflow and want to
// ensure that updates happen in your repository first.
'allowAutoUpdates' => false,
),
// Config settings for the DEV environment
// ------------------------------------------------------------
'dev' => array(
// Give us more useful error messages
'devMode' => true,
),
// Config settings for the LOCAL environment
// ------------------------------------------------------------
'local' => array(
// Give us more useful error messages
'devMode' => true,
// Have Craft send ALL emails to a single address
'testToEmailAddress' => 'your@email.com',
// Some settings helpful for debugging
'phpMaxMemoryLimit' => '256M',
'backupDbOnUpdate' => true,
'translationDebugOutput' => false,
'useCompressedJs' => true,
'cacheDuration' => 'P1D',
// Make member login settings nice and trusting
// by allowing a user to stay logged in for 101 years
// and relaxing various other related settings
// http://www.php.net/manual/en/dateinterval.construct.php
'userSessionDuration' => 'P101Y',
'rememberedUserSessionDuration' => 'P101Y',
'rememberUsernameDuration' => 'P101Y',
'invalidLoginWindowDuration' => 'P101Y',
'cooldownDuration' => 'PT1S',
'maxInvalidLogins' => 101,
)
);
]]>This article is a collection of custom toolbars configs that you can copy and paste to use in your Craft CMS projects. If you would like to submit a custom config to be included for reference in this article, please send us a note.
If you don't know how to setup and use custom toolbars, see the Rich Text field documentation in the Craft docs or read more about custom toolars in our article How to add custom redactor toolbars to the default Rich Text field in Craft CMS.
{
buttons: ['bold', 'italic', 'link']
}
Download 'Simple With Link' Config'
{
buttons: ['html','formatting','bold','italic','unorderedlist','orderedlist','link','image','video'],
plugins: ['fullscreen', 'pagebreak'],
formattingTags: ['p', 'blockquote', 'h2', 'h3', 'h4']
}
Download 'Standard with Simple Formatting'
{
buttons: ['html','formatting','bold','italic','unorderedlist','orderedlist','link','image','video'],
plugins: ['fullscreen', 'pagebreak'],
autoresize: false,
minHeight: 200
}
]]>The default Rich Text field in Craft CMS comes with three options to use as your toolbar: Default, Simple, and Standard.
If you'd like to add custom toolbars, you can do so by adding custom toolbar config file in your craft/config/redactor
folder. Redactor is the WYSIWYG html editor that Craft uses for its Rich Text field and a Redactor config file is a json file that tells Redactor what settings it should be using to build your toolbar.
Let's create a new toolbar called 'Simple With Link' which is just like the default Rich Text 'Simple' config but adds a link button as well.
To create this new toolbar, create a new Simple With Link.json
file in your craft/config/redactor
folder and add the following json code:
{
buttons: ['bold', 'italic', 'link']
}
Let's take a closer look at what each part of this code does:
{ | Begin the json object |
buttons | Use the keyword 'buttons' to tell Redactor that we want to add some button settings and what follows will be an array of buttons that we want to use in our toolbar |
: | The colon after our keyword 'buttons' separates our keyword from the array of settings that it is associated with |
[ | Begin our toolbar settings array |
'bold' | Use the keyword 'bold' to display a bold button |
, | Separate values in our array with a comma |
'italic' | Use the keyword 'italic' to display a bold button |
, | Separate values in our array with a comma |
'link' | Use the keyword 'link' to display a bold button |
] | End our toolbar settings array |
} | End the json object |
To view the list of buttons that are available, you can take a look at the 'buttons' setting in the Redactor documentation.
Let's take a look at a slightly more advanced toolbar config now. We'll keep the toolbar buttons simple so we can focus on what else is happening here. In the following config, we create a toolbar which includes a bold and italic button and we add two new settings which allow us to set a fixed height for our Rich Text field.
{
buttons: ['bold', 'italic'],
autoresize: false,
minHeight: 400
}
Let's take a closer look at how the autoresize
and minHeight
settings are being used in our toolbars json settings object:
{ | Begin the json object |
autoresize | Use the keyword 'autoresize' to tell Redactor that we want to set the option for height autoresizing |
: | The colon separates our keyword from the following settings value it is associated with |
false | Setting the 'autoresize' setting to false tells Redactor that we want our Rich Text field to have a fixed height. |
, | Separate each key/value pair in our settings object with a comma |
minHeight | Redactor does not have a 'height' option, so now that we've set our Rich Text field to have a fixed height with the 'autoresize' setting, we can use the 'minHeight' setting to set the height that we want. |
: | The colon separates our keyword from the following settings value it is associated with |
400 | The number we use for our 'minHeight' setting will be the number of pixels high we want our Rich Text field to be |
} | End the json object |
You can find both the 'autoresize' setting and the 'minHeight' setting in the Redactor documentation.
If you've referred to any of the Redactor docs linked above, you'll notice that in the Redactor documentation, we see these settings being used in examples which use a line of javascript. In our custom toolbar settings files however, we only need to use the json object. Let's take a quick look at how the Redactor docs relate to our Rich Text toolbar settings files.
In the Redactor docs, to set autoresize
we see the following code:
$('#redactor').redactor({ autoresize: false });
In our use case with Craft, the actual javascript doesn't matter here. Craft is handling the Rich Text field type and will run the necessary javascript code for us: $('#redactor').redactor();
. The settings we are preparing in our json object will be handed off to that javascript, so we just need to focus on the json object that is being passed to the examples in the Redactor docs { autoresize: false }
.
Let's look at that example again and rename some of the variables to how they are being used in the context of Craft:
$('#idOfOurRichTextFieldInCraft').redactor( ourCustomToolbarSettings );
idOfOurRichTextFieldInCraft: We don't have to worry about this setting, Craft will handle it and set it up when we create our Rich Text field.
ourCustomToolbarSettings: This is the json object we create and place in our toolbar.json file in the craft/config/redactor
folder
{
buttons: ['bold', 'italic'],
autoresize: false,
minHeight: 400
}
Some of the buttons in our Rich Text toolbar also have secondary settings that we can customize. The formatting
button provides the user a dropdown menu of several HTML tags to choose from. By default, the formatting
button includes all of its supported tags ['p', 'blockquote', 'pre', 'h1', 'h2', 'h3', 'h4']
. We can customize that list of tags using the 'formattingTags' setting. Here's how that would look:
{
buttons: ['formatting', 'bold', 'italic'],
formattingTags: ['h2', 'h3', 'p', 'blockquote']
}
Let's walk through this one step by step:
{ | Begin the json object |
buttons | Use the keyword 'buttons' to tell Redactor that we want to add some button settings and what follows will be an array of buttons that we want to use in our toolbar |
: | The colon separates our keyword from the following settings value it is associated with |
['formatting', 'bold', 'italic'] | This is our 'buttons' settings array. The button 'formatting' has additional settings which we can set using the 'formattingTags' setting we've set below. |
, | Separate each key/value pair in our settings object with a comma |
formattingTags | Use the keyword 'formattingTags' to tell Redactor that, if the 'formatting' button is in use, we want to customize which HTML tags it uses. |
: | The colon separates our keyword from the following settings value it is associated with |
['h2', 'h3', 'p', 'blockquote'] | This is our 'formattingTags' settings array and lists all of the supported HTML tags that we want to include in the dropdown menu for our 'formatting' button. |
} | End the json object |
There are a lot more settings you can explore in the Redactor documentation. While we've tried to keep the above examples simple to illustrate specific things, we can also combine all of these settings and create more advanced customized toolbars. Here's what a toolbar using all of the above customizations (and a few more) would look like:
{
buttons: ['html', 'formatting', 'bold', 'italic','link'],
plugins: ['fullscreen'],
formattingTags: ['h2', 'h3', 'p', 'blockquote'],
autoresize: false,
minHeight: 400
}
View and download more custom Redactor configs and submit your own custom toolbars to help us build a library of examples we can all use in our projects or just for inspiration.
We’re humbled and thrilled to see so many people diving into Craft’s plugin APIs, and sharing their work with the rest of the community... Pixel & Tonic
Craft makes it extremely easy for us to interact with the content in our database within our templates. Perhaps the most useful item for this is the Craft entry
variable.
If Craft knows that the Entries in one of our sections have their own URLs, Craft provides us a variable to help us output all of our content for that Entry. This is true for Singles as well as Channels and Structures where we have selected the setting 'Entries in this section have their own URLs'. Let's take a look at each:
When we create a Single in our Section settings, we have to tell that Single our Entry Template
. The Entry Template maps to the template we want to use to display our content in our templates
folder when the Entry URL is visited in the browser.
For example, a user who visits http://website.com/about
may be served the content that is displayed in our file craft/templates/about.html
In our about.html
template, we can use the Craft entry
variable to access all of the content from our About Entry.
{# Single Template #}
{{ entry.title }}
{{ entry.url }}
{{ entry.anyFieldNameUsedInOurAboutSection }}
While a Channel may have many entries, if we select the setting 'Entries in this section have their own URLs' we can tell Craft which template we want to use for each individual Entry in our Channel.
For example, a user who visits http://website.com/articles/article-slug
may be served the content that is displayed in our file craft/templates/articles/_entry.html
.
In our articles/_entry.html
file we can use the Craft entry
variable to access all of the content from our Article Entry for that URL being requested by the browser.
Just as before:
{# Individual Entry Template for our Channel #}
{{ entry.title }}
{{ entry.url }}
{{ entry.anyFieldNameUsedInOurArticleEntry }}
Individual entries for Structures behave just as Singles and Channels. One difference is that Structures may have an extra segments in their URL referencing their parent Entries. In our Section settings, we still tell a Structure section the Entry Template
in which to use to display our individual entry pages, and Craft provides us the entry
variable just as before.
{# Individual Entry Template for our Structure #}
{{ entry.title }}
{{ entry.url }}
{{ entry.anyFieldNameUsedInOurStructureEntry }}
The behavior we are seeing above also can be applied to other Elements in Craft. When we setup a Category Group in Craft we can select a familiar option as we have seen above: Categories in this group have their own URLs.
We can define our Category URL Format
and Category Template
and when an individual category is requested from our Category Template
, Craft provides us a category
variable that behaves just like the entry
variable giving us easy access to all of the fields that are available for our Category.
{# Category template #}
{{ category.name }}
{{ category.url }}
{{ category.anyFieldNameUsedInOurCategoryGroupEntry }}
]]>Twig is the templating language used to display your content in your Craft CMS templates. While there is a lot to learn about Twig, this article will focus on a few key concepts that can get you started, and take you far.
Let's over-simplify and say that nearly all that we are doing in Twig falls into the following 5 groups:
To display content in out templates, we use the Twig output tag:
{# Output a Craft Global #}
{{ siteName }}
{# Output a slug from your url #}
{{ craft.request.getSegment(2) }}
{# Output a translatable string #}
{{ "This is just text" }}
{{ "This is translatable text"|t }}
{# Output a translatable variable #}
{{ siteName|t }}
Some content in our templates can't be output directly to the template because it contains an multiple peices of content. To loop through content, we use Twig's action tag:
{# Loop through several articles #}
{% for entry in craft.entries.section('articles') %}
{{ entry.title }}
{# Loop through a table field within our content #}
{% for row in entry.tableFieldName %}
{{ row.columnName }}
{% endfor %}
{# Loop through an Assets field within our content #}
{% for image in entry.assetFieldName %}
{{ image.filename }}
{% endfor %}
{# Loop through an Entry Relations field within our content #}
{% for relatedEntry in entry.entriesFieldName %}
{{ relatedEntry.title }}
{% endfor %}
{% endfor %}
When we need to conditionally display content, we can use logic in our templates.
{# The if statement checks to see if something is true before displaying it #}
{% if currentUser.admin %}
{# Display an edit link for our admin #}
{{ entry.getCpEditUrl() }}
{% endif %}
{# The if/else statement can check multiple conditions #}
{% if entry.type == 'link' %}
{# Display fields related to your 'link' entry type #}
{% elseif entry.type == 'video' %}
{# Display fields related to your 'video' entry type #}
{% else %}
{# Display our default post type #}
{% endif %}
{# The switch tag can compare multiple conditions as well #}
{% switch entry.type %}
{% case "link" %}
{# Display fields related to your 'link' entry type #}
{% case "video" %}
{# Display fields related to your 'video' entry type #}
{% default %}
{# Display our default post type #}
{% endswitch %}
Sometimes we need to modify the content we output in our templates. We can do so using Twig functions and filters:
{# Use the raw filter to output HTML content as HTML #}
{{ entry.textareaFieldFullOfHtml|raw }}
{# Use the translate filter to translate content in the translations folder #}
{{ "This is translatable text"|t }}
{# Use multiple filters by chaining them together
In this example, we strip the HTML tags from our description, santize the output so any special characters are escaped, and make sure that we are only displaying the first 160 characters #}
{{ entry.description|striptags|escape|slice(0,160) }}
All of the above Twig concepts help us display content in our templates. Twig also gives us some handy tools that make it easier to manage the code in our templates:
{# Create a variable to use later. #}
{% set bodyId = 'homepage' %}
{# Include code from a separate template file #}
{% include 'folder/filename' %}
A variable you created can be used in an included file.
{# Your homepage template #}
{% set bodyId = 'homepage' %}
{% include '_partials/header' %}
{# Your '_partials/header' template could then include #}
<body id="{{ bodyId }}">
You can also override variables in a layout template
{# Your '_layouts/layout' template might look like the following #}
<html>
<head>
<title></title>
</head>
<body id="{{ bodyId }}">
{% block content %}{% endblock %}
</body>
</html>
{# Then you can create a template where you extend your layout with more specific content #}
{% extends '_layouts/layout' %}
{% set bodyId = 'homepage' %}
{% block content %}
{# The HTML and body content for your homepage #}
{% endblock %}
Twig is a powerful and flexible templating language. While we have over-simplified things here, most of your daily Twig templating needs will fall within these 5 categories. Understanding these concepts will help you get started, troubleshoot common template errors, and build a strong foundation for managing website templates using Twig.
]]>"Thankfully, Craft CMS came out with Matrix, and from this content modeling feature our minds have been blown." "Matrix allows us to create content blocks, each of which are collections of fields that they can be styled uniquely and dynamically in a website's templates." Seth Giammanco
Here are a few common tasks you might do in your templates, as they would be written in ExpressionEngine vs. Craft... Brandon Kelly
Cameron Spear
The registerCpRoutes()
method in our primary plugin class PrimaryClassName.php
allows to route a particular URL to a template.
// PluginClassName.php
// Redirect a CP request from `pluginname/edit`
// to the `pluginname/templates/_edit.html` template
public function registerCpRoutes()
{
return array(
'pluginname/edit' => 'pluginname/_edit',
);
}
Notice that we omit the templates
folder from the route and Craft knows that pluginname/_edit
should actually be routed to the pluginname/templates/_edit
template.
However, in some cases, we may not want to route directly to a template. Craft also allows us to route a request to a controller instead.
// PluginClassName.php
// Redirect a CP request from `pluginname/edit`
// to the method `editItem()` in the controller
// `pluginname/controllers/PluginNameController.php`
public function registerCpRoutes()
{
return array(
'pluginname/edit' => array('action' => 'pluginName/editItem'),
);
}
Again, notice that we omit the controllers
folder from our route. When we make our route an array with the action
key, Craft knows to use redirect the request to your controller, in this case pluginname/controllers/editItem
.
You may want to reconsider redirecting to the Controller instead of the template when you find yourself adding too much logic into your templates that could be handled more easily in PHP.
In our controller we can do several things which include creating variables that will be available to our tempaltes and telling Craft which template we want to route the request to after we are done.
// PluginNameController.php
public function actionEditItem()
{
// Create any variables you want available in your template
$variables['items'] = craft()->pluginName->getAllItems();
// Load a particular template and with all of the variables you've created
$this->renderTemplate('pluginname/_edit', $variables);
}
In the above example, we could then access the items
variable in our pluginname/templates/_edit
template.
{% for item in items %}
{{ item }}
{% endfor %}
In more advanced plugins, you may need multiple controllers. When we add multiple controllers the syntax for our route changes slightly and we need to be sure to reference our controller in the second segment of the routes action
value. Note the difference below in how we route to PluginNameController.php
and
PluginName_AnotherController.php
.
// PluginClassName.php
public function registerCpRoutes()
{
return array(
// Route to our primary controller
// `pluginname/controllers/PluginNameController.php`
'pluginname/edit' => array('action' => 'pluginName/editItem'),
// Route to a secondary controller
// `pluginname/controllers/PluginName_AnotherController.php`
'pluginname/edit' => array('action' => 'pluginName/another/editItem'),
);
}
]]>In this post we will show you how to handle the `order.completed` event to update your Craft entries when someone buys a product on your website... Snipcart
Craft is a powerful tool to manage relations between your content. Craft doesn't have a single "relationship" field, but several relational field types. These include Entries, Assets, Users, Categories, and Tags.
Let's pretend we are an agency and we want to create a relationship between our Projects which appear in our Project Gallery and our Services which appear on our Services page. We will do this by creating two channels 'Projects' and 'Services'.
In our Projects Channel we will create an Entries
field called 'Related Services' where we can select one or more Services that were provided for that Project. In our template, we will loop through the 'Related Services' Entries field to display all of our Project's related 'Services':
{# Project Template: templates/projects/_entry #}
{% for service in entry.servicesEntriesField %}
{{ service.title }}
{% endfor %}
Our Entries field behaves just like all of the other relational fields (Assets, Categories, Tags, Users) and we can interact with it in the same way that we interact with any other fields that have an array of data in our templates, such as: Checkbox, Dropdown, Multi-select, and Radio field options; Matrix field blocks; and Table rows. While our related entries may be an Entries
field here, we can treat our entries the same as we would if we were looping through a Channel and Structure Section.
{% for entry in entry.servicesEntriesField %}
{# We can interact with the entries in our Entries Field loop #}
{{ entry.title }}
{{ entry.url }}
{% endfor %}
{% for entry in craft.entries('projects') %}
{# The same way we interact with entries as we loop through our Sections #}
{{ entry.title }}
{{ entry.url }}
{% endfor %}
If we combine those two snippets with our example:
{# We will update the Section `entry` variable to be called
`project` so it's easier for us to identify in our loop #}
{% for project in craft.entries('projects') %}
{# Our Project Entry information #}
{{ project.title }}
{{ project.url }}
{# We'll also update the Field `entry` variable to be called
`services` so it's easier for us to identify in our nested loop #}
{% for service in entry.servicesEntriesField %}
{# Our Services Entry information #}
{{ service.title }}
{{ service.url }}
{% endfor %}
{% endfor %}
Now let's say we wanted to do the opposite: display all of our 'Projects' on our individual 'Services' page. In our current example, the 'Related Services' Entries field is in our Projects channel, so we can't just loop through the field like we did before. Our Services Section does not have a Projects
Entries field. And we don't want to have to add and maintain this data in two places. So what do we do?
In this situation, we can dynamically retrieve the information we need in our template using the relatedTo()
parameter. Let's take a look at how we do this:
{# Services Template: templates/services/_entry
In this template `entry` is one of our Service Entries #}
{% set relatedProjects = craft.entries.section('projects').relatedTo(entry) %}
{% for service in relatedProjects %}
{{ service.title }}
{% endfor %}
Let's take a closer look at what this code is doing. On its own, the craft.entries
tag says: Get me all Entries in the Projects section.
craft.entries.section('projects')
When we add the relatedTo()
parameter, the full tag reads: Get me all Entries in the Projects section, but, only if they are have a relationship with the specific Service that we are identifying in the relatedTo parameter. Remember, in our example, entry
is one of our Service Entries.
craft.entries.section('projects').relatedTo(entry)
We then assign those results to a variable we created called relatedProjects
.
{% set relatedProjects = craft.entries.section('projects').relatedTo(entry) %}
And loop through those results just like we would any array of Entries we interact with in Craft:
{% for project in relatedProjects %}
{{ project.title }}
{% endfor %}
Again, it's important to note that while we may be accessing our Entries in several different ways, all of entries we are interacting with in the examples above are EntryModel
s. We can treat every EntryModel
(on a single page, in a for loop, in a relational field, or as a reverse relationship) just like we would any other EntryModel
in the system.
To review the EntryModel
's we've seen above:
entry
is an EntryModel
. This is also true for Sections that are Singles
.craft.entries('projects')
is an array of EntryModel
s. Each time we loop through an array we access an individual EntryModel
.entry.servicesEntriesField
is an array of EntryModel
s. craft.entries.section('projects').relatedTo(entry)
is an array of EntryModel
s. If you want to try to push these concepts a bit further, here's one more, largely academic, example about how we can combine all of these different scenarios into one template. For the sake of exploration in this next example, we will assume we have a Singles page in which we will display both our Project content with related Service information. On top of this, within our Services information, we will also create a reverse relationship back to our Projects.
{# Our Singles Section EntryModel can be accessed with the `entry` variable #}
{{ entry.title }}
{{ entry.description }}
{# We will grab all of the EntryModels for our Projects Section using the
craft.entries('projects') and identify each EntryModel as we loop through
them with the `project` variable name #}
{% for project in craft.entries('projects') %}
{# Our Project Entry information #}
{{ project.title }}
{{ project.url }}
{# We will grab all of the EntryModels for our related Services via the
Services Entries Field `entry.servicesEntriesField` and identify each
EntryModel as we loop through them with the `service` variable name #}
{% for service in entry.servicesEntriesField %}
{# Our Services Entry information #}
{{ service.title }}
{{ service.url }}
{# Within our Services Field loop, we can now create a relationship back
to the projects. We updated our `entry` variable in the relatedTo()
parameter to the `service` variable that represents the EntryModel of
each service entry in our services loop. #}
{% set relatedProjects = craft.entries.section('projects').relatedTo(service) %}
{# Since we have already used the `project` variable above and we are still
within a loop where we can access that `project variable`, we want to
make sure to name the variable that refers to the Project EntryModel in
this loop differently. We'll call it `nestedProject`. #}
{% for nestedProject in relatedProjects %}
{{ nestedProject.title }}
{{ nestedProject.url }}
{% endfor %}
{% endfor %}
{% endfor %}
]]>{# craft.categories tag #}
{% set categories = craft.categories.first() %}
{% set categories = craft.categories.last() %}
{% set categories = craft.categories.find() %}
{% set categories = craft.categories.ids() %}
{% set categories = craft.categories.total() %}
{% set category = craft.categories({
id: id OR 'not id' OR '1,2,3' OR [1,2,3],
fixedOrder: true OR false,
group: 'handle',
groupId: id,
locale: 'en_us',
limit: number,
indexBy: 'id', 'title',
offset: id,
order: 'title,id,groupId,slug,uri desc',
slug: 'slug',
uri: 'uri',
ancestorOf: CategoryModel OR id,
ancestorDist: level, {# number of levels above ancestorOf #}
descendantOf: CategoryModel OR id,
descendantDist: level, {# number of levels below descendantOf #}
nextSiblingOf: CategoryModel OR id,
prevSiblingOf: CategoryModel OR id,
level: level,
relatedTo: AssetFileModel, EntryModel, UserModel,
CategoryModel, TagModel,
elementId,
[ arrayOfModels, arrayOfModels, arrayOfModels ],
[ 1, 2, 3 ],
craft.assets, craft.categories, craft.entries,
craft.tags, craft.users
search: 'salty dog' containing both "salty" and "dog"
'"salty dog"' containing the exact phrase "salty dog"
'salty OR dog' containing either "salty" or "dog" (or both)
'salty -dog' containing "salty" but not "dog"
'body:salty' containing "salty" in the "body" field
'body:salty' body:dog containing both "salty" and "dog"
in the "body" field
'body:*' containing anything within the "body" field
'salty locale:en_us' containing "salty" in the locale "en_us"
'salt*' containing a word that begins with "salt"
'*ty' containing a word that ends with "ty"
'*alt*' containing a word that contains "alt",
}) %}
{% for category in categories %}
{# CategoryModel #}
{# Properties #}
{{ user.ancestors }} {# true,false #}
{{ user.children }}
{{ user.cpEditUrl }}
{{ user.dateCreated }}
{{ user.dateUpdated }}
{{ user.descendants }}
{{ user.enabled }}
{{ user.group }}
{{ user.id }}
{{ user.level }}
{{ user.link }}
{{ user.locale }}
{{ user.next }}
{{ user.nextSibling }}
{{ user.parent }}
{{ user.prev }}
{{ user.prevSibling }}
{{ user.siblings }} {# active, locked, suspended, pending, archived #}
{{ user.slug }}
{{ user.title }}
{{ user.uri }}
{{ user.url }}
{# Methods #}
{{ entry.getAncestors( distance ) }}
{{ entry.getChildren() }}
{{ entry.getDescendants( distance ) }}
{{ entry.getGroup() }}
{{ entry.getLink() }}
{{ entry.getNextSibling() }}
{{ entry.getParent() }}
{{ entry.getPrevSibling() }}
{{ entry.getSiblings() }}
{{ entry.getUrl() }}
{{ entry.isAncestorOf( category ) }}
{{ entry.isChildOf( category ) }}
{{ entry.isDescendantOf( category ) }}
{{ entry.isNextSiblingOf( category ) }}
{{ entry.isParentOf( category ) }}
{{ entry.isPrevSiblingOf( category ) }}
{{ entry.isSiblingOf( category ) }}
{% set prev = category.getPrev( params ) %}
{% set next = category.getNext( params ) %}
{% if prev %} <a href="/link-to-prev-category">{{ prev.url }}</a> {% endif %}
{% if next %} <a href="/link-to-next-category">{{ next.url }}</a> {% endif %}
{% endfor %}
]]>One of the key innovations in Craft – make that the key innovation – is a new concept called “Element Types”... Pixel & Tonic
As we design and develop websites we don't always have all of the final resources for a project available to us. In the case that you just need to output some repeating items on your page, you can use this code snippet:
{% for i in 1..5 %}
<p>{{ i }}. This text will display in your template 5 times.</p>
{% endfor %}
That code would output:
<p>1. This text will display in your template 5 times.</p>
<p>2. This text will display in your template 5 times.</p>
<p>3. This text will display in your template 5 times.</p>
<p>4. This text will display in your template 5 times.</p>
<p>5. This text will display in your template 5 times.</p>
This can be useful for building out index pages, highlight content, galleries, or any other repeating items in your designs that you wish to build out before you have the actual data. The syntax above is Twig's shorthand for the range
operator. A little more clearly, that same code could be written like so:
{% for i in range(1, 5) %}
<p>{{ i }}. This text will display in your template 5 times.</p>
{% endfor %}
If the situation calls for it, we can do the same using letters. Let's make this example a bit more advanced and use each letter to create a list links, like we might find on a directory page.
<ul>
{% for letter in 'a'..'z' %}
<li><a href="directory#{{ letter }}">{{ letter }}</a></li>
{% endfor %}
</ul>
That example will output the following code in your template:
<ul>
<li><a href="directory#a">a</a></li>
<li><a href="directory#b">b</a></li>
<li><a href="directory#c">c</a></li>
<!-- The rest of the alphabet -->
</ul>
When our database is ready and full of content, we can then go through our templates and just swap out our temporary for
loop with the range
function {% for i in 1..5 %}
and substitute in our appropriate Craft tag {% for entry in craft.entries.section('blog').limit(5) %}
and field variables.
Our dummy loop:
{% for i in 1..5 %}
<h2>Example Title</h2>
<p>Lorem ipsum dolor sit amet, consectetur adipisicing elit.</p>
<p>Ut enim ad minim veniam, quis nostrud exercitation.</p>
{% endfor %}
Transitions nicely into our actual loop:
{% for entry in craft.entries.section('blog').limit(5) %}
<h2>{{ entry.title }}</h2>
{{ entry.body }}
{% endfor %}
]]>Craft makes it easy for you to add a log file for your plugin. Using the static method PluginClassName::log()
. Craft will create a new log file for you in the folder craft/storage/runtime/logs
and name it after your plugin using all lowercase letters pluginname.log
Using the Sprout Active
plugin as an example, in the most simple form, we would add the following line anywhere we wanted to output a message:
SproutActivePlugin::log('This is it.');
By default, the log()
behavior just outputs information, however, our log()
function can be refined a bit more if we need with three different log levels:
To log a warning or an error message, we just need to pass the appropriate LogLevel
as the second argument:
// Our default Log Level is Info
SproutActivePlugin::log('Just sharing some information', LogLevel::Info);
// We need to specifically add the second argument for Warnings and Errors
SproutActivePlugin::log('Hey, watch out now!', LogLevel::Warning);
SproutActivePlugin::log('Uh oh.', LogLevel::Error);
We will see the level of the log item appear in our log file:
2014/04/08 00:25:36 [info] [plugin] Just sharing some information
2014/04/08 00:25:36 [warning] [plugin] Hey, watch out now!
2014/04/08 00:25:36 [error] [plugin] Uh oh.
If devMode
is not enabled, you will only see log messages for warnings and errors in the logs. If devMode
is enabled, you will see all of the messages logged. Additionally, with devMode
enabled, Craft also adds a stack trace, which includes a bit more information about the files and methods that were triggered before your item got logged.
If you want a log item to appear regardless of whether devMode
is enabled, you can pass true as the third argument to the log()
method.
SproutActivePlugin::log('Log this with or without devMode enabled.', LogLevel::Info, true);
If you'd like to see more examples, search for "Craft::log" in the Craft app folder and take a look at how Craft is handling its own log files. Craft's Craft::log()
method behaves just like the PluginClassName::log()
method.
There are several ways you can monitor and check your log files.
craft/storage/runtime/logs
. http://yourwebsite.com/admin/utils/logs
tail
command: tail /path/to/craft/storage/runtime/logs/sproutactiveplugin.log
. The tail
command will output your log messages to the console while you work.If you need to deprecate a feature in one of your plugins that other folks might be using, Craft also has a way to log deprecation errors so that they will appear in the Deprecation Logs page in the Control Panel's hidden Utilities section, located at admin/utils/deprecationerrors
.
You can do this using the Deprecation Service.
craft()->deprecator->log($key, $message);
An actual example might look like the following. The key will make sure your message is only logged once in a request, and the message should clearly tell a user reading the message the steps they can take to fix the deprecation error.
craft()->deprecator->log('craft()->sproutActive->oldSchoolFunction()', 'craft()->sproutActive->oldSchoolFunction() has been deprecated. Use craft()->sproutActive->newFunction() instead.');
]]>To display a list of categories that are in use (and make sure you are not displaying any categories that don't have content associated with them), you will need to take a couple of steps. Here's a barebones examples of the code we will need, and we will break it out into more detail below.
{% set entryIds = craft.entries.section('blog').ids() %}
{% set categories = craft.categories.relatedTo({ sourceElement: entryIds }).groupId(1).find() %}
{% for category in categories %}
<li><a href="{{ category.url }}">{{ category.title }}</a></li>
{% endfor %}
First, we want to grab all of the entry ids from the Section of content which we want to display categories for.
{% set entryIds = craft.entries.section('blog').ids() %}
Next, we will use the craft.categories tags relatedTo() method to only return categories that have a relationship with one of our entry ids.
{% set categories = craft.categories.relatedTo({ sourceElement: entryIds }).groupId(1).find() %}
Once we have our list of categories that are in use, we can loop through those categories and display them in our template:
<ul>
{% for category in categories %}
<li><a href="{{ category.url }}">{{ category.title }}</a></li>
{% endfor %}
</ul>
]]>Pixel & Tonic
On a Single page or within a Channel or Structure craft.entries loop, you can access all of your fields using the entry
variable. You can access the first image in an Assets field in the following way:
{% set image = entry.assetFieldHandle.first() %}
<img src="{{ image.getUrl() }}" width="{{ image.getWidth() }}" height="{{ image.getHeight() }}">
Note: You must interact with your Asset fields as if they are arrays, even if you just have a single image.
If we have an image transform setup in our settings, we can pass that transform to each of our asset methods getUrl()
, getWidth()
, and getHeight()
.
{% set image = entry.assetFieldHandle.first() %}
<img src="{{ image.getUrl('transformHandle') }}" width="{{ image.getWidth('transformHandle') }}" height="{{ image.getHeight('transformHandle') }}">
If we want to confirm that we have an image before we try to output the image, we can test the Asset field using the |length
filter.
{% if entry.assetFieldHandle | length %}
{% set image = entry.assetFieldHandle.first() %}
<img src="{{ image.getUrl() }}" width="{{ image.getWidth() }}" height="{{ image.getHeight() }}">
{% endif %}
Since our Assets field is an array, we can also try to access our images as if we were working with an array. Since an array starts with number zero, we can do the following:
{% set image = entry.assetFieldHandle[0] %}
<img src="{{ image.getUrl() }}" width="{{ image.getWidth() }}" height="{{ image.getHeight() }}">
]]>Many websites have an archive page that displays content based on the date in the URL.
To create an archive page in Craft we need to take a couple of steps:
In this article we will focus on creating a route to your archive page template, and analyzing the details of what that route is doing.
To make your archive page to be based on the year and month of your posts, add the following to the array in your craft/config/routes.php
file.
return array(
'blog/(?P<year>\d{4})/(?P<month>\d{2})' =>
'blog/index'
);
This route will allow us to have URLs such as blog/2012/10
and it will tell Craft that we want to use our blog/index.html
template to output the archive page. Let's take a closer look at the details:
blog | First segment of the url matches the word blog |
/ | Match a forward slash in the URL |
( | Parentheses begin to create a stored variable pattern |
?P | This letter combination allows us to create a variable pattern |
<year> | The word in the angle brackets is our variable, which will be accessible on the page as {{ year }} |
\d | This means our pattern can include any digits 0-9 |
{4} | A number within curly brackets tells us that their must be 4 digits total for a match |
) | End parentheses denotes the end of our stored variable pattern |
/ | Match a forward slash in the URL |
( | Parentheses begin to create a stored variable pattern |
?P | This letter combination allows us to create a variable pattern |
<month> | The word in the angle brackets is our variable, which will be accessible on the page as {{ month }} |
\d | This means our pattern can include any digits 0-9 |
{2} | A number within curly brackets tells us that their must be 2 digits total for a match |
) | End parentheses denotes the end of our stored variable pattern |
The following is an outline for looping through a Single, Channel, or Structure entry with multiple Entry Types in which some of your Entry Types may include a Matrix Field and which some of your Matrix Field's blocks may include an Assets field.
Let's build our output step by step. First, let's build a template to check for each of our Entry Types. We want to make sure we are only trying to output the fields within each Entry Type, if that Entry Type exists.
{% if entry.type == 'post' %}
{# Post Entry Type fields go here #}
{% elseif entry.type == 'link' %}
{# Link Entry Type fields go here #}
{% elseif entry.type == 'video' %}
{# Video Entry Type fields go here #}
{% endif %}
Our Post has a Matrix field with an Assets field within one of our Matrix blocks. We'll start by testing for each of our Matrix Blocks in a similar way to how we tested for our Entry Types. This time we'll use the switch
statement, but a simple if
statement would work as well.
{% for block in entry.matrixFieldHandle %}
{% switch block.type %}
{% case 'textBlock' %}
{# Our Text Block fields go here #}
{% case 'quoteBlock' %}
{# Our Quote Block fields go here #}
{% case 'imageBlock' %}
{# Our Image Block fields go here #}
{% endswitch %}
{% endfor %}
Now that we have our framework, we can start outputting our individual fields within each block. In this article, we'll just focus on the Asset field in our image block. Our image block contains a gallery of images, so we will loop through our assets field to output all the images that it has.
{% for image in block.assetFieldHandle %}
<img src="{{ image.getUrl() }}" width="{{ image.getWidth() }}" height="{{ image.getHeight() }}" alt="{{ image.title }}">
{% endfor %}
Now let's bring this all together. First we check for which Entry Type we have, then we check for which Matrix Block we have, and then we loop through all the images that we find.
{% if entry.type == 'post' %}
{# Post Entry Type fields go here #}
{% for block in entry.matrixFieldHandle %}
{% switch block.type %}
{% case 'textBlock' %}
{# Our Text Block fields go here #}
{% case 'quoteBlock' %}
{# Our Quote Block fields go here #}
{% case 'imageBlock' %}
{# Our Image Block fields go here #}
{% for image in block.assetFieldHandle %}
<img src="{{ image.getUrl() }}" width="{{ image.getWidth() }}" height="{{ image.getHeight() }}" alt="{{ image.title }}">
{% endfor %}
{% endswitch %}
{% endfor %}
{% elseif entry.type == 'link' %}
{# Link Entry Type fields go here #}
{% elseif entry.type == 'video' %}
{# Video Entry Type fields go here #}
{% endif %}
]]>{# craft.entries tag #}
{% set entries = craft.entries.first() %}
{% set entries = craft.entries.last() %}
{% set entries = craft.entries.find() %}
{% set entries = craft.entries.ids() %}
{% set entries = craft.entries.total() %}
{% set entries = craft.entries({
id: id OR 'not id' OR '1,2,3' OR [1,2,3],
fixedOrder: true OR false,
slug: 'slug',
uri: 'uri',
sectionId: id,
section: 'sectionHandle', ['handle','handle'],
SectionModel, [SectionModel,SectionModel],
locale: 'en_us',
localEnabled: true OR false,
authorId: id,
authorGroupId: id,
authorGroup: id,
after: 'YYYY,YYYY-MM,YYYY-MM-DD,YYYY-MM-DD HH:MM,YYYY-MM-DD HH:MM:SS',
before: 'Unix timestamp,DateTime variable',
status: 'live,pending,expired,disabled,null',
archived: true OR false,
offset: number,
ancestorOf: EntryModel OR id,
ancestorDist: level, {# number of levels above ancestorOf #}
descendantOf: EntryModel OR id,
descendantDist: level, {# number of levels below descendantOf #}
nextSiblingOf: EntryModel OR id,
prevSiblingOf: EntryModel OR id,
level: level, {# for Structure entries #}
order: 'title,id,authorId,sectionId,slug,uri,postDate,expiryDate desc',
limit: number,
indexBy: 'id,title',
relatedTo: AssetFileModel, EntryModel, UserModel,
CategoryModel, TagModel,
elementId,
[ arrayOfModels, arrayOfModels, arrayOfModels ],
[ 1, 2, 3 ],
craft.assets, craft.categories, craft.entries,
craft.tags, craft.users
search: 'salty dog' containing both "salty" and "dog"
'"salty dog"' containing the exact phrase "salty dog"
'salty OR dog' containing either "salty" or "dog" (or both)
'salty -dog' containing "salty" but not "dog"
'body:salty' containing "salty" in the "body" field
'body:salty' body:dog containing both "salty" and "dog"
in the "body" field
'body:*' containing anything within the "body" field
'salty locale:en_us' containing "salty" in the locale "en_us"
'salt*' containing a word that begins with "salt"
'*ty' containing a word that ends with "ty"
'*alt*' containing a word that contains "alt"
}) %}
{% for entry in entries %}
{# EntryModel #}
{# Properties #}
{{ entry.ancestors }}
{{ entry.author }}
{{ entry.authorId }}
{{ entry.children }}
{{ entry.cpEditUrl }}
{{ entry.dateCreated }}
{{ entry.dateUpdated }}
{{ entry.descendants }}
{{ entry.enabled }}
{{ entry.expiryDate }}
{{ entry.id }}
{{ entry.level }}
{{ entry.link }}
{{ entry.locale }}
{{ entry.next }}
{{ entry.nextSibling }}
{{ entry.parent }}
{{ entry.postDate }}
{{ entry.prev }}
{{ entry.prevSibling }}
{{ entry.section }}
{{ entry.sectionId }}
{{ entry.siblings }}
{{ entry.slug }}
{{ entry.status }}
{{ entry.title }}
{{ entry.type }}
{{ entry.uri }}
{{ entry.url }}
{# Methods #}
{{ entry.getAncestors( distance ) }}
{{ entry.getAuthor() }}
{{ entry.getChildren() }}
{{ entry.getCpEditUrl() }}
{{ entry.getDescendants( distance ) }}
{{ entry.getLink() }}
{{ entry.getNextSibling() }}
{{ entry.getParent() }}
{{ entry.getPrevSibling() }}
{{ entry.getSection() }}
{{ entry.getSiblings() }}
{{ entry.getUrl() }}
{{ entry.isAncestorOf( entry ) }}
{{ entry.isChildOf( entry ) }}
{{ entry.isDescendantOf( entry ) }}
{{ entry.isNextSiblingOf( entry ) }}
{{ entry.isParentOf( entry ) }}
{{ entry.isPrevSiblingOf( entry ) }}
{{ entry.isSiblingOf( entry ) }}
{% set prev = entry.getPrev( params ) %}
{% set next = entry.getNext( params ) %}
{% if prev %} <a href="{{ prev.url }}">{{ prev.title }}</a> {% endif %}
{% if next %} <a href="{{ next.url }}">{{ next.title }}</a> {% endif %}
{% endfor %}
]]>SITE
{{ siteName }}
{{ siteUrl }}
DATE
{{ now.year }}
{{ now.month }}
{{ now.day }}
{{ now|date("M d, Y") }}
{{ now|date_modify("+1 day") }}
USERS
{# UserModel #}
{# Properties #}
{{ currentUser }} {# null if no user is logged in #}
{{ currentUser.admin }}
{{ currentUser.dateCreated }}
{{ currentUser.dateUpdated }}
{{ currentUser.email }}
{{ currentUser.fullName }}
{{ currentUser.friendlyName }}
{{ currentUser.groups }}
{{ currentUser.firstName }}
{{ currentUser.lastName }}
{{ currentUser.lastLoginDate }}
{{ currentUser.name }}
{{ currentUser.next }}
{{ currentUser.id }}
{{ currentUser.isCurrent }}
{{ currentUser.photoUrl }}
{{ currentUser.preferredLocale }}
{{ currentUser.prev }}
{{ currentUser.status }} {# active, locked, suspended, pending, archived #}
{{ currentUser.username }}
{# Methods #}
{{ currentUser.can( 'permission' ) }}
{{ currentUser.getFullName() }}
{{ currentUser.getFriendlyName() }}
{{ currentUser.getGroups() }}
{{ currentUser.getName() }}
{% set params = { group: 'authors', order: 'firstName, lastName' } %}
{{ currentUser.getNext( params ) }}
{{ currentUser.getPrev( params ) }}
{{ currentUser.getPhotoUrl( 100 ) }}
{{ currentUser.isInGroup( groupId, UserGroupModel, 'groupHandle' ) }}
{{ loginUrl }}
{{ logoutUrl }}
GLOBALS
{{ globalSetName.fieldName }}
TAGS
{{ craft.assets }}
{{ craft.categories }}
{{ craft.config }}
{{ craft.entries }}
{{ craft.fields }}
{{ craft.feeds }}
{{ craft.request }}
{{ craft.session }}
{{ craft.tags }}
{{ craft.users }}
]]>{# craft.tags tag #}
{% set tags = craft.tags.first() %}
{% set tags = craft.tags.last() %}
{% set tags = craft.tags.find() %}
{% set tags = craft.tags.ids() %}
{% set tags = craft.tags.total() %}
{% set tags = craft.tags({
id: id OR 'not id' OR '1,2,3' OR [1,2,3],
fixedOrder: true OR false,
name: 'name',
group: 'handle',
groupId: id,
order: 'id,setId,name asc',
limit: number,
indexBy: 'id,name',
locale: 'en_us',
offset: number,
relatedTo: AssetFileModel, EntryModel, UserModel,
CategoryModel, TagModel,
elementId,
[ arrayOfModels, arrayOfModels, arrayOfModels ],
[ 1, 2, 3 ],
craft.assets, craft.categories, craft.entries,
craft.tags, craft.users
search: 'salty dog' containing both "salty" and "dog"
'"salty dog"' containing the exact phrase "salty dog"
'salty OR dog' containing either "salty" or "dog" (or both)
'salty -dog' containing "salty" but not "dog"
'body:salty' containing "salty" in the "body" field
'body:salty' body:dog containing both "salty" and "dog"
in the "body" field
'body:*' containing anything within the "body" field
'salty locale:en_us' containing "salty" in the locale "en_us"
'salt*' containing a word that begins with "salt"
'*ty' containing a word that ends with "ty"
'*alt*' containing a word that contains "alt"
}) %}
{% for tag in tags %}
{# TagModel #}
{# Properties #}
{{ tag.id }}
{{ tag.name }}
{{ tag.locale }}
{{ tag.next }}
{{ tag.prev }}
{{ tag.groupId }}
{# Methods #}
{% set prev = tag.getPrev( params ) %}
{% set next = tag.getNext( params ) %}
{% if prev %} <a href="/link-to-prev-tag">{{ prev.name }}</a> {% endif %}
{% if next %} <a href="/link-to-next-tag">{{ next.name }}</a> {% endif %}
{% endfor %}
]]>{# Properties #}
{{ craft.request.firstSegment }}
{{ craft.request.isAjax }}
{{ craft.request.isLivePreview }}
{{ craft.request.isSecure }}
{{ craft.request.lastSegment }}
{{ craft.request.pageNum }}
{{ craft.request.path }}
{{ craft.request.segments }}
{{ craft.request.serverName }}
{{ craft.request.url }}
{# Methods #}
{{ craft.request.isMobileBrowser() }}
{{ craft.request.isMobileBrowser(true) }} {# includes tablets #}
{{ craft.request.getCookie( name ) }}
{{ craft.request.getFirstSegment() }}
{{ craft.request.getLastSegment() }}
{{ craft.request.getPageNum() }}
{{ craft.request.getPath() }}
{{ craft.request.getSegment(n) }}
{{ craft.request.getSegments() }}
{{ craft.request.getServerName() }}
{{ craft.request.getUrl() }}
{{ craft.request.getPost(name) }} {# Returns a parameter from the POST data. #}
{{ craft.request.getQuery(name) }} {# Returns a parameter from the query string. #}
{{ craft.request.getParam(name) }} {# Returns a parameter from either the query string or POST data. #}
]]>{# craft.assets tag #}
{% set assets = craft.assets.first() %}
{% set assets = craft.assets.last() %}
{% set assets = craft.assets.find() %}
{% set assets = craft.assets.ids() %}
{% set assets = craft.assets.total() %}
{% set assets = craft.assets.find({
id: id,
fixedOrder: true OR false,
filename: 'fileName.jpg',
folderId: id,
height: 200,
offset: number,
size: 1000,
sourceId: id,
width: 200,
kind: AssetFileModel, EntryModel, UserModel,
CategoryModel, TagModel,
elementId,
[ arrayOfModels, arrayOfModels, arrayOfModels ],
[ 1, 2, 3 ]
craft.assets, craft.categories, craft.entries,
craft.tags, craft.users
relatedTo: AssetFileModel, EntryModel, UserModel,
CategoryModel, TagModel,
elementId,
[ arrayOfModels, arrayOfModels, arrayOfModels ],
[ 1, 2, 3 ]
craft.assets, craft.categories, craft.entries,
craft.tags, craft.users
order: 'title,id,sourceId,folderId,filename,kind,width,height,size desc',
limit: 'number',
indexBy: 'id,title',
search: 'salty dog' containing both "salty" and "dog"
'"salty dog"' containing the exact phrase "salty dog"
'salty OR dog' containing either "salty" or "dog" (or both)
'salty -dog' containing "salty" but not "dog"
'body:salty' containing "salty" in the "body" field
'body:salty' body:dog containing both "salty" and "dog"
in the "body" field
'body:*' containing anything within the "body" field
'salty locale:en_us' containing "salty" in the locale "en_us"
'salt*' containing a word that begins with "salt"
'*ty' containing a word that ends with "ty"
'*alt*' containing a word that contains "alt",
}) %}
{% for asset in assets %}
{# AssetFileModel #}
{# Properties #}
{{ asset.dateCreated }}
{{ asset.dateUpdated }}
{{ asset.filename }}
{{ asset.folderId }}
{{ asset.height }}
{{ asset.id }}
{{ asset.kind }}
{{ asset.size }}
{{ asset.sourceId }}
{{ asset.url }}
{{ asset.width }}
{# Methods #}
{{ asset.getChildren( fields ) }}
{{ asset.getParents( fields ) }}
{{ asset.getHeight( fields ) }}
{{ asset.getWidth( fields ) }}
{{ asset.getUrl( fields ) }}
{% set prev = asset.getPrev( params ) %}
{% set next = asset.getNext( params ) %}
{% if prev %} <a href="/link-to-prev-asset">{{ prev.title }}</a> {% endif %}
{% if next %} <a href="/link-to-next-asset">{{ next.title }}</a> {% endif %}
{% endfor %}}
]]>{# Required #}
{% set feedUrl = "http://feeds.feedburner.com/blogandtonic" %}
{% set items = craft.feeds.getFeedItems(feedUrl, limit, offset, cacheDuration) %}
{% for item in items %}
{{ item.title }}
{{ item.summary }}
{{ item.content }}
{{ item.date }}
{{ item.dateUpdated }}
{{ item.permalink }}
{{ item.authors }}
{{ item.authors[0].name }}
{{ item.authors[0].url }}
{{ item.authors[0].email }}
{{ item.contributors }}
{{ item.contributors[0].name }}
{{ item.contributors[0].url }}
{{ item.contributors[0].email }}
{{ item.categories }}
{{ item.categories[0].term }}
{{ item.categories[0].scheme }}
{{ item.categories[0].label }}
{% endfor %}
]]>{# craft.users tag #}
{% set users = craft.users.first() %}
{% set users = craft.users.last() %}
{% set users = craft.users.find() %}
{% set users = craft.users.ids() %}
{% set users = craft.users.total() %}
{% set user = craft.users({
id: id OR 'not id' OR '1,2,3' OR [1,2,3],
fixedOrder: true OR false,
admin: true OR false,
email: 'email',
firstName: 'firstName',
group: 'groupHandle',
groupId: id,
indexBy: 'id,username'
lastName: 'lastName',
limit: number,
offset: number,
order: 'username,firstName,lastName,email,language,status,lastLoginDate desc',
status: 'active,locked,suspended,pending,archived,*',
username: 'username',
can: 'createEntries:5',
relatedTo: AssetFileModel, EntryModel, UserModel,
CategoryModel, TagModel,
elementId,
[ arrayOfModels, arrayOfModels, arrayOfModels ],
[ 1, 2, 3 ],
craft.assets, craft.categories, craft.entries,
craft.tags, craft.users
search: 'salty dog' containing both "salty" and "dog"
'"salty dog"' containing the exact phrase "salty dog"
'salty OR dog' containing either "salty" or "dog" (or both)
'salty -dog' containing "salty" but not "dog"
'body:salty' containing "salty" in the "body" field
'body:salty' body:dog containing both "salty" and "dog"
in the "body" field
'body:*' containing anything within the "body" field
'salty locale:en_us' containing "salty" in the locale "en_us"
'salt*' containing a word that begins with "salt"
'*ty' containing a word that ends with "ty"
'*alt*' containing a word that contains "alt",
}) %}
{% for user in users %}
{# UserModel #}
{# Properties #}
{{ user.admin }} {# true,false #}
{{ user.dateCreated }}
{{ user.dateUpdated }}
{{ user.email }}
{{ user.fullName }}
{{ user.friendlyName }}
{{ user.groups }}
{{ user.firstName }}
{{ user.lastName }}
{{ user.lastLoginDate }}
{{ user.name }}
{{ user.next }}
{{ user.id }}
{{ user.isCurrent }}
{{ user.photoUrl }}
{{ user.preferredLocale }}
{{ user.prev }}
{{ user.status }} {# active, locked, suspended, pending, archived #}
{{ user.username }}
{# Methods #}
{{ user.can( 'permission' ) }}
{{ user.getFullName() }}
{{ user.getFriendlyName() }}
{{ user.getGroups() }}
{{ user.getName() }}
{{ user.getPhotoUrl( size) }}
{{ user.isInGroup( groupHandle OR groupId OR UserGroupModel ) }}
{% set prev = user.getPrev( params ) %}
{% set next = user.getNext( params ) %}
{% if prev %} <a href="/link-to-prev-user">{{ prev.username }}</a> {% endif %}
{% if next %} <a href="/link-to-next-user">{{ next.username }}</a> {% endif %}
{% endfor %}
]]>10 specific reasons why we love Craft CMS, David Letterman Style. ::Drumroll:: Adam McCombs
Craft Cookbook is a growing collection of task-oriented recipes, designed to get you to a working solution, fast. Experience
In a world that requires specialized Drupal developers, Wordpress developers, ExpressionEngine developers, and other pre-renaissance CMS developers, Craft CMS gives me hope for a day when being a PHP developer is enough... Sam Hernandez
The best way to explain Craft Entry Types in relation to Sections is by turning to a platform with a similar setup: Tumblr. Tumblr is a blogging service, and just like on any other blog, you can publish entries, display those entries in a listing and filter them by tags... Kristen Grote
It was almost this time last year that I blogged about why MODX is our preferred CMS and whilst MODX still holds a warm place in our hearts it was about time that we surveyed the landscape and tried out some of the newer contenders in the content management space... Ennovate Design
Are you contemplating the Craft CMS? Ben Parizek is on the show to explain why it has become his CMS of choice, what developing for Craft is like, his thoughts on its architecture and its future, as well as ideas on education, documentation and the future of plugin development for the platform. CTRL+CLICK CAST
It was difficult for me to determine which platform to use for the latest version of this site [masuga.com]. Decisions about whether or not to have a database, and how I would be writing content had me flipping back and forth between different content management systems. I ended up with Craft CMS. Here's why... Ryan Masuga
Welcome to Twig! If you're a frontend developer and you're using Twig in your project, then this course is for you! We'll talk about how to use Twig from the ground-up, clearly pointing out its syntax and then graduating to some really neat and advanced tricks. Twig is awesome to work with, so don't just use Twig, master it! Knp University
The following are some highlights of my time with Craft and why I feel it can benefit both content publishers and web developers. Naomi Royall
Manage all of your Craft, ExpressionEngine, and Wordpress sites in one place Lamplighter
Early this year we were introduced to an amazing content management system (CMS) called Craft and I'd like to say that the rest is history... Adam McCombs
Brandon Kelly joins the show to discuss his Craft CMS. Brandon shares why Pixel & Tonic expanded its focus beyond add-ons and consulting to create Craft, and offers a peek at the iterative development process he and his team followed in building Craft. We discuss how Craft is different from other CMSes, some of the features that enhance the user experience, and the learning curve involved. CTRL+CLICK CAST
Full disclosure: never have I ever used a custom CMS before — until I tried Craft — and I freaking love it (which is fitting, because I also love crafts) Una Kravats
In this video you will learn how to install Craft CMS on your Windows PC with WAMP Server... Tahir Taous
In 2 ½ hours of HD video, watch as Ryan builds a website in the brand new Craft CMS. Learning Craft consists of 3 videos and covers everything from installation to asset management to templating. Need a primer on using Craft? This video is for you. Ryan Irelan
What P&T have done is built a Content Management System in the truest sense, from the ground up. What I mean by this is that Craft was built to do one thing and do it well, and that is to manage content. Feel free to take a deep breath of fresh air... Ben Crocker
Craft has recently gone into beta and it’s definitely worth a look. Here, we interview one of its creators, Brandon Kelly on the philosophy behind Craft and its technical aspects... The Nerdary
Pixel & Tonic
Default templates and a custom, multi-environment setup for Craft CMS. Barrel Strength Design
Pixel & Tonic
Learn Craft CMS and build easy to use, stunning websites and web applications for your business and your clients. Straight Up Craft
Pixel & Tonic
Luke Holder
The Craft Community
The Craft Community
If you are interested in plugin development, this educational plugin brings together many of the examples in the documentation and is a good place to get started. Adrian Macneil
Larry Ullman
Yii Software
Sensio Labs
Sensio Labs
Pixel & Tonic
Pixel & Tonic